INTRODUCTION
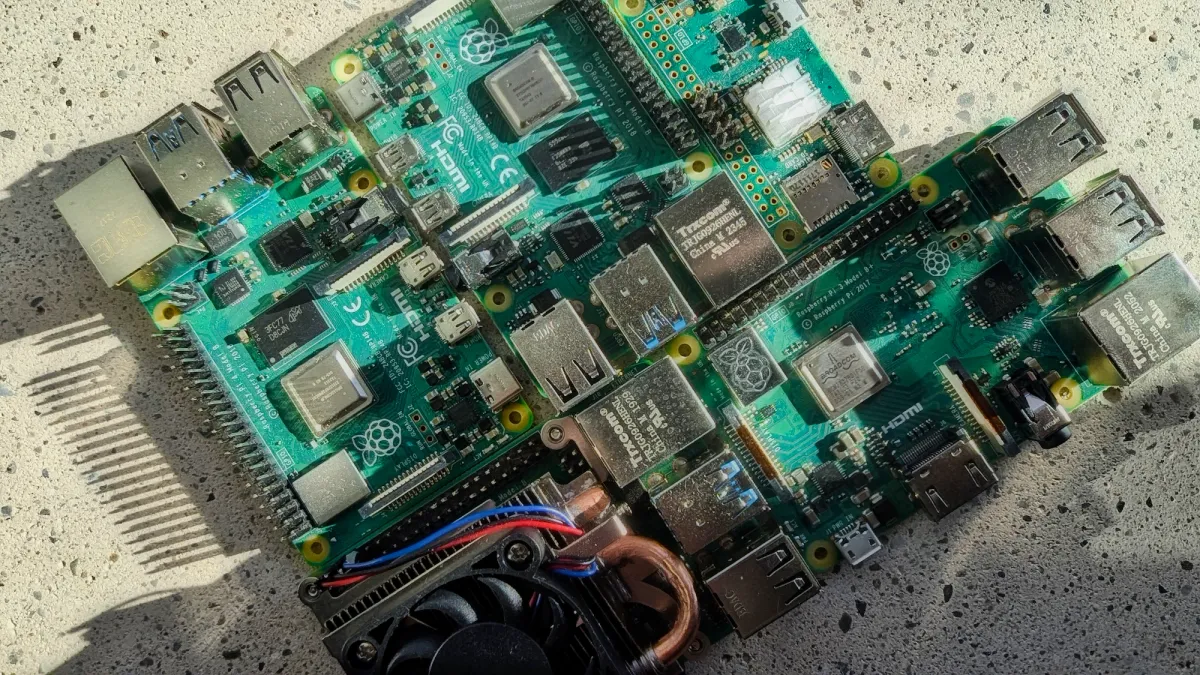
The Raspberry Pi is a remarkably versatile microcomputer. We use it in a variety of ways—for example, as a cost-effective alternative to pricey BrightSign players for looping full HD and 4K videos, as a core component in kinetic art installations, and even as a networking tool to help enhance our privacy. And those are just a few of its many potential use cases.
Raspberry Pi OS is a Linux-based operating system specifically developed for the Raspberry Pi. And yes, it’s FOSS - Free and Open Source Software!
There are many ways to set up a Raspberry Pi. The steps outlined below are just one example, with a particular focus on security (along with a few performance tweaks). This will serve as the base setup for all of our Raspberry Pi tutorials.
In this guide, we’ll be using an Apple computer running macOS. You won’t need an external monitor, keyboard, or mouse for your Raspberry Pi, as we’ll be doing what's called a headless setup, everything will be done remotely.
INSTALLATION
- 0 - REQUIRED HARDWARE
- 1 - DOWNLOAD RASPBERRY PI IMAGER
- 2 - FLASH RASPBERRY PI OS
- 3 - Boot up your Raspberry Pi and find it on your local network
- 4 - Connect to your Raspberry Pi via SSH
SECURITY
- 0 - Update your System
- 1 - Create Separate Admin & Login User Accounts
- 2 - Harden SSH Security
- 3 - setup a FIREWALL
- 3.1 - optionally disable IPv6
- 4 - fail2ban
- 5 - Unattended Upgrades
TWEAKS
INSTALLATION
headless setup
0 - REQUIRED HARDWARE
- Apple Computer (macOS)
With a built-in SD card reader or an external SD card adapter. - Local Wi-Fi Network
Typically your home router. - Raspberry Pi Board
Any compatible model, depending on your use case. - MicroSD Card
Used to install and run the operating system. - Reliable Power Supply
Make sure it meets the power requirements of your specific Raspberry Pi model. - Ethernet Cable (optional)
For a wired network connection, if preferred over Wi-Fi.
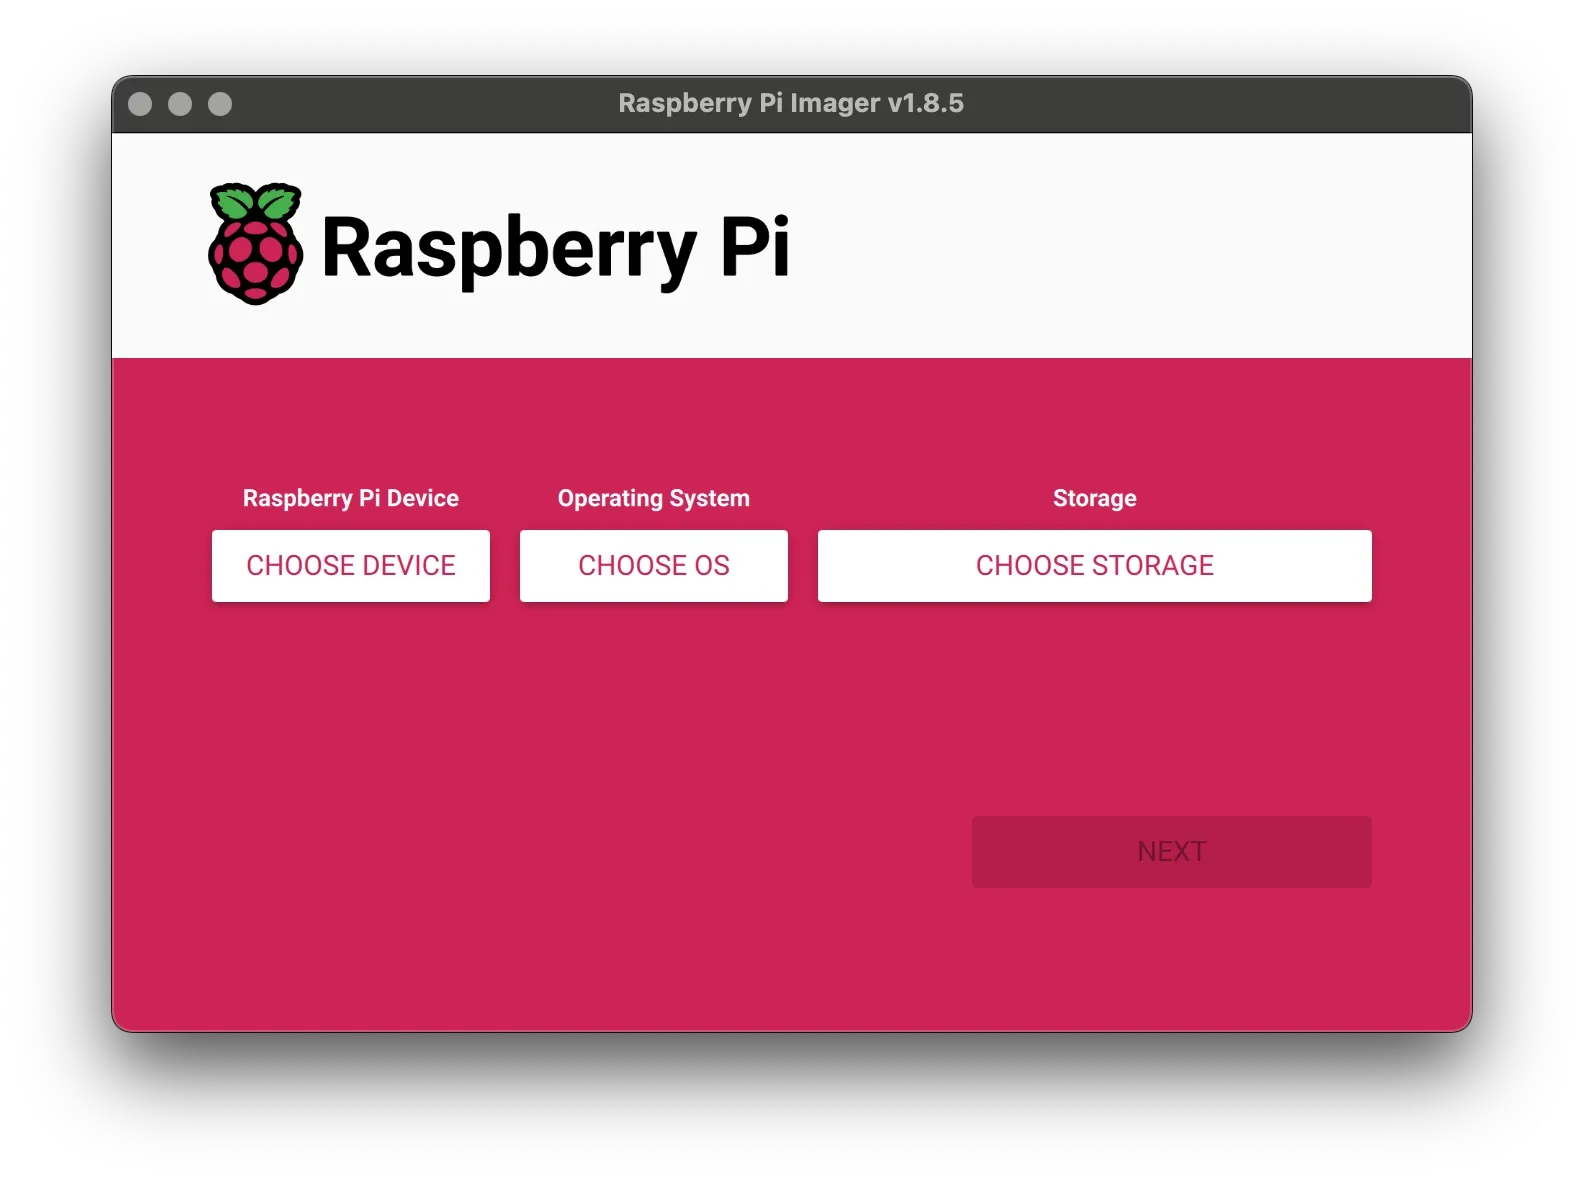
1 - DOWNLOAD RASPBERRY PI IMAGER
Start by downloading the official Raspberry Pi Imager application. While it’s possible to install a Linux system manually, using the Imager is by far the easiest and most user-friendly way to write an operating system to your microSD card.
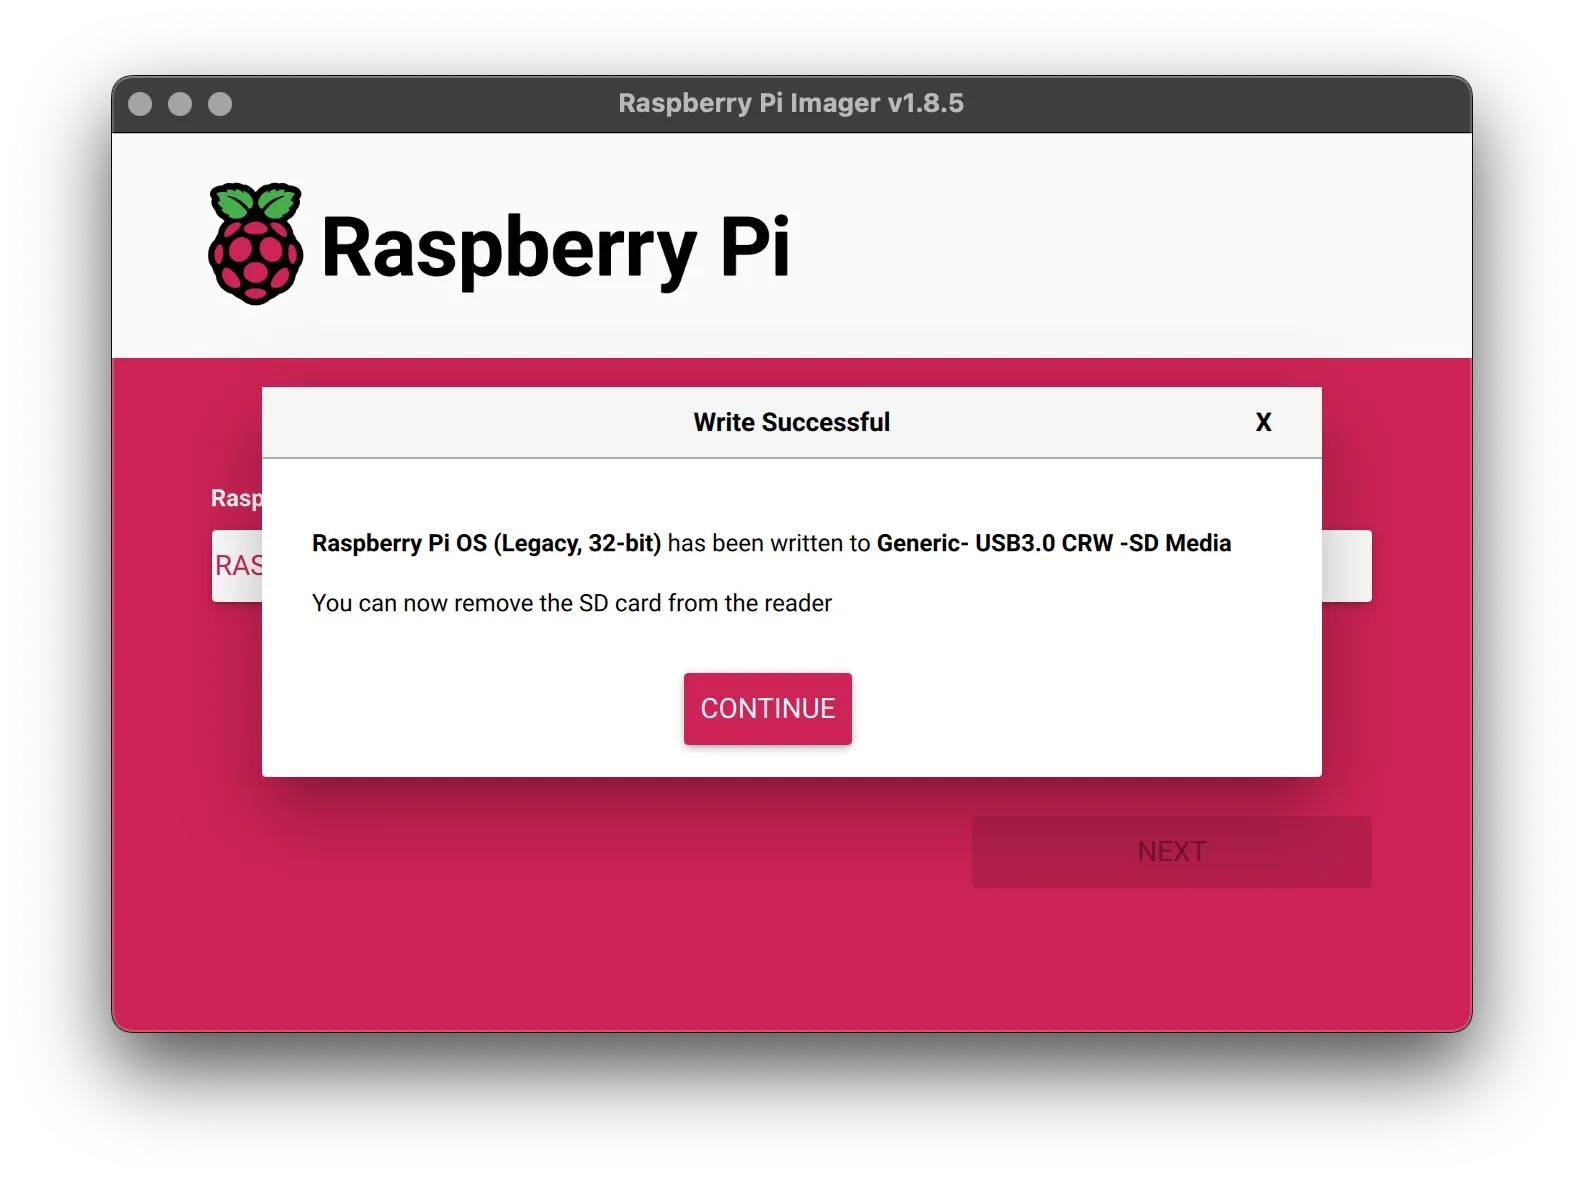
2 - FLASH RASPBERRY PI OS
Once Raspberry Pi Imager is open, follow these steps to flash the operating system onto your microSD card:
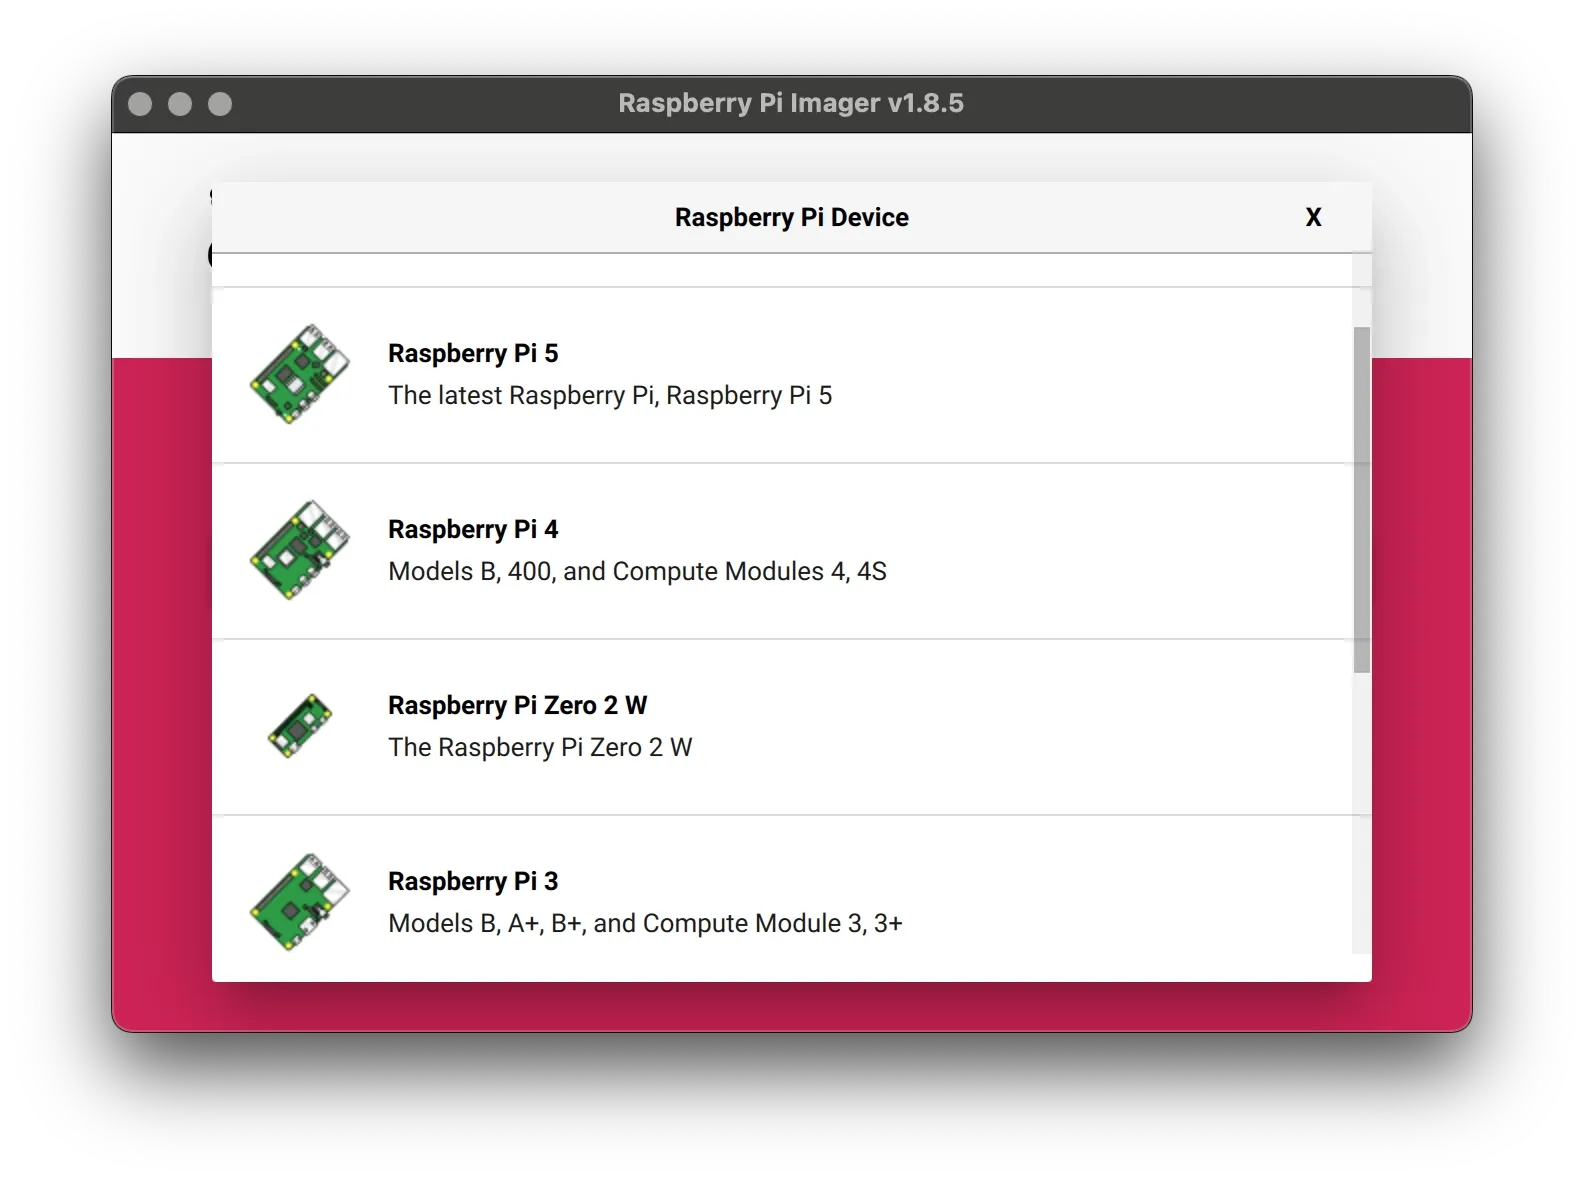
- Choose Device
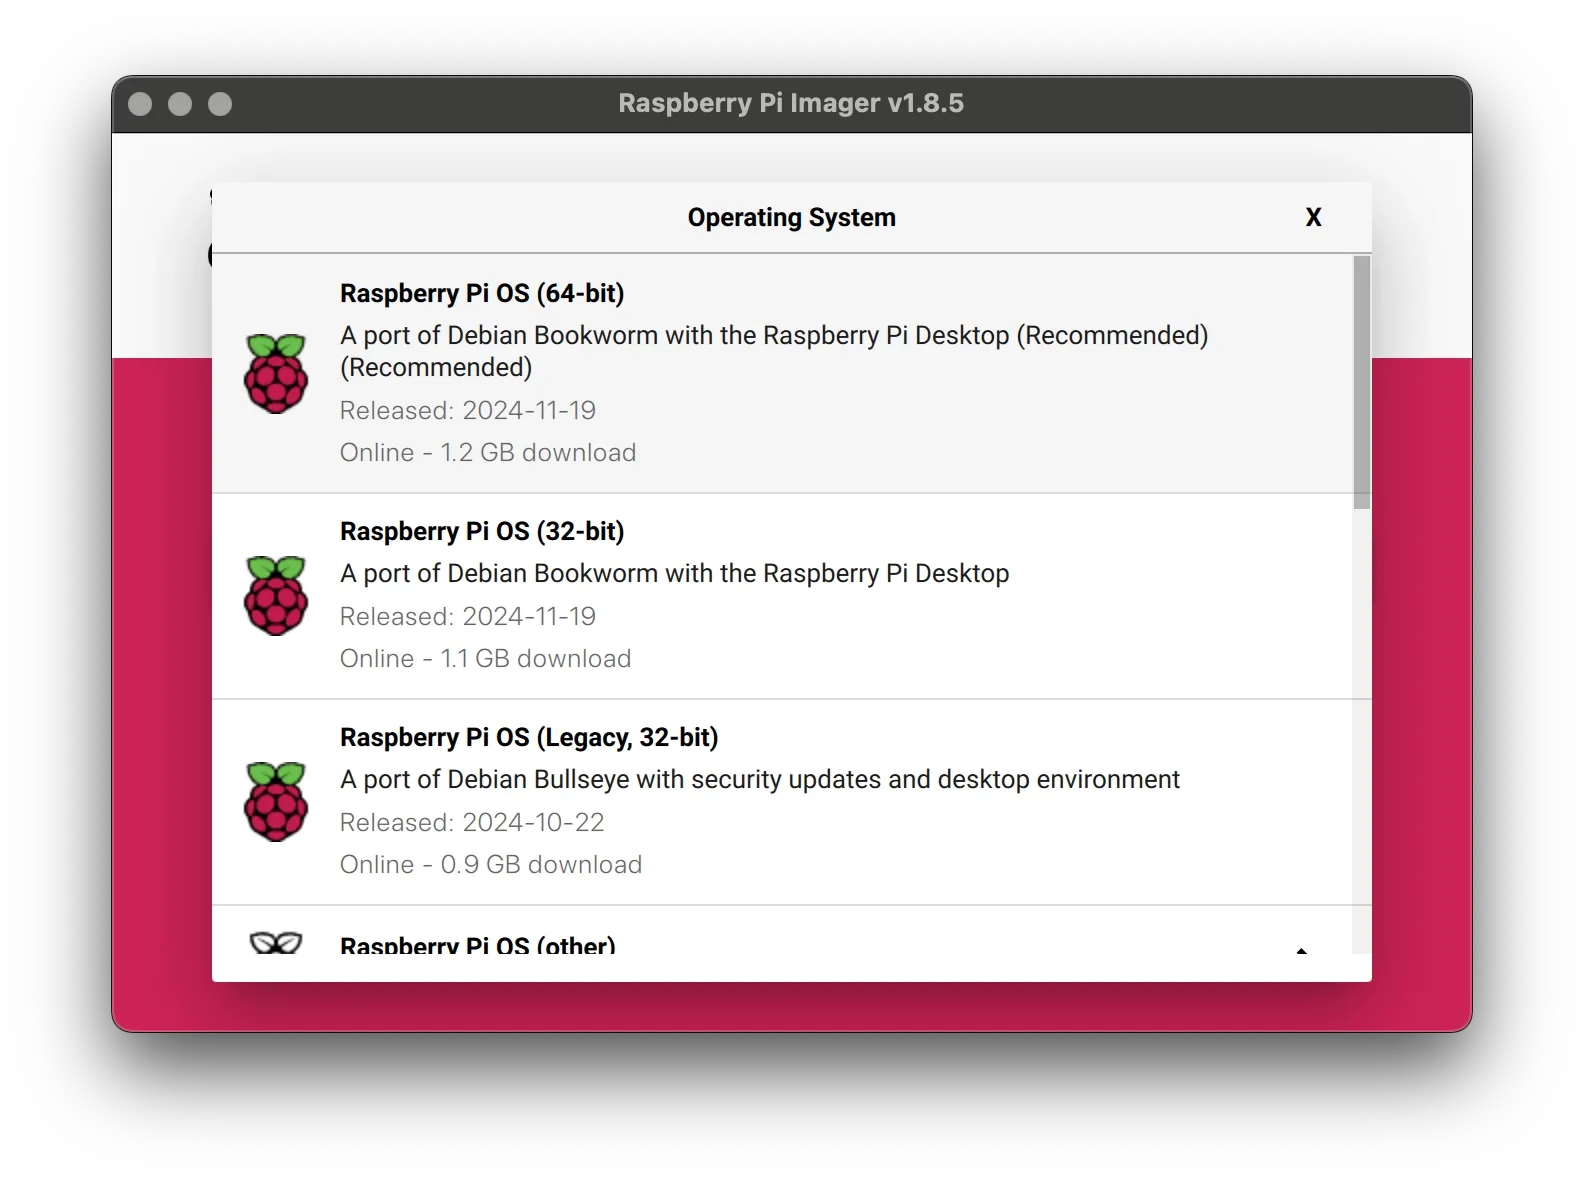
Select your Raspberry Pi model from the list. - Choose OS
Pick the operating system you want to install. - Choose Storage
Select your microSD card from the available drives.
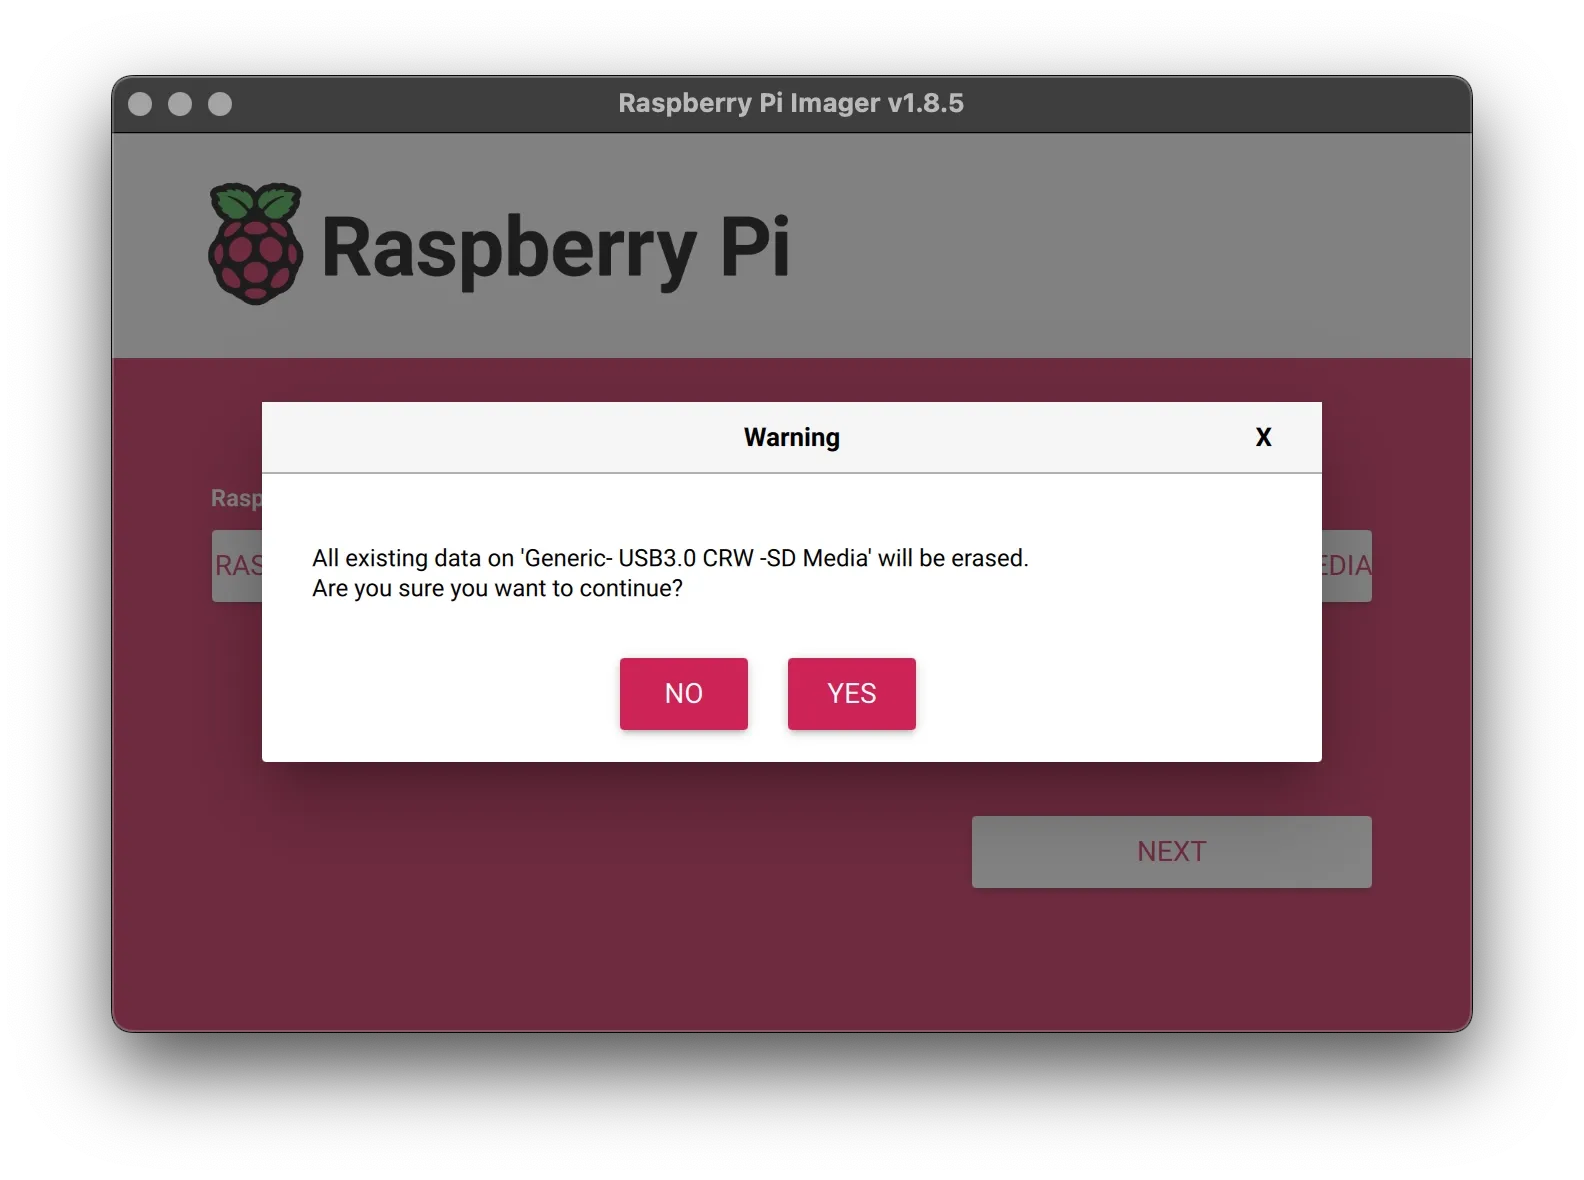
Important: This process will erase all data on the selected SD card. Make sure to back up any important files before proceeding.
When you're ready, click [NEXT] to begin flashing the OS.
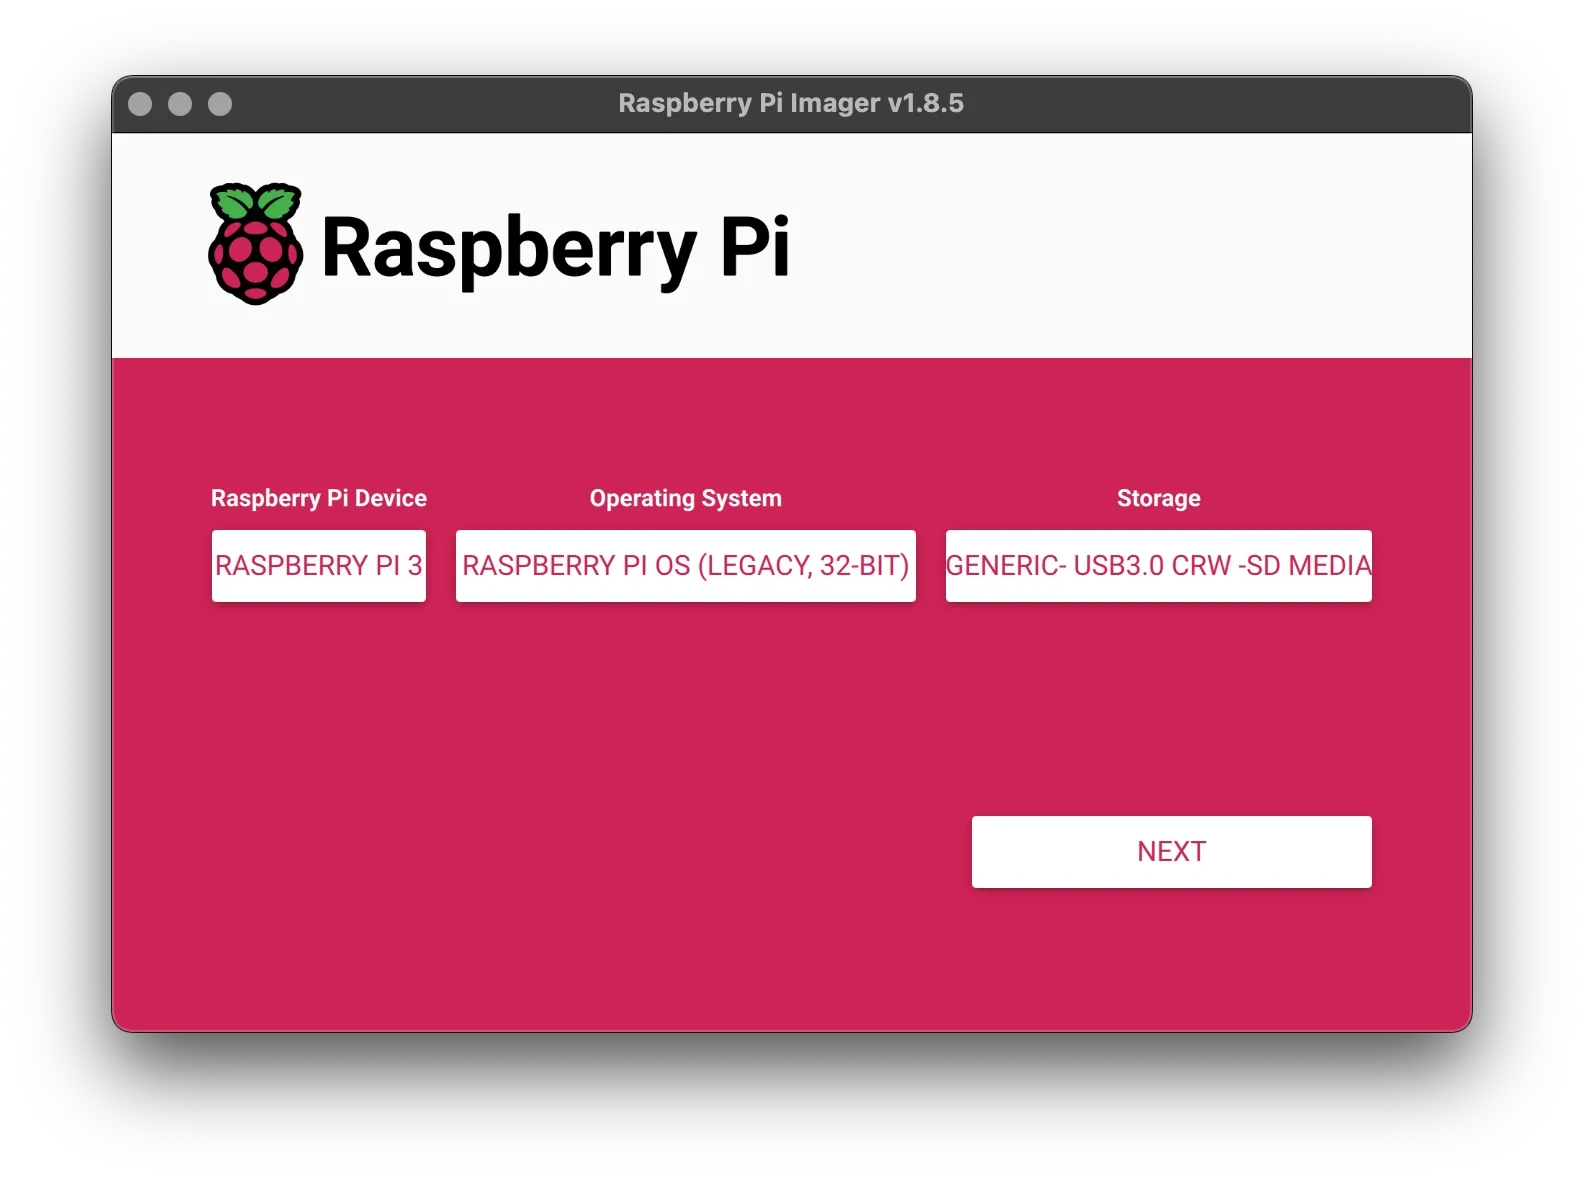
Example: Raspberry Pi 3 // Raspberry Pi Os (Legacy, 32-Bit) // Generic USB3.0 CRW - SD Media
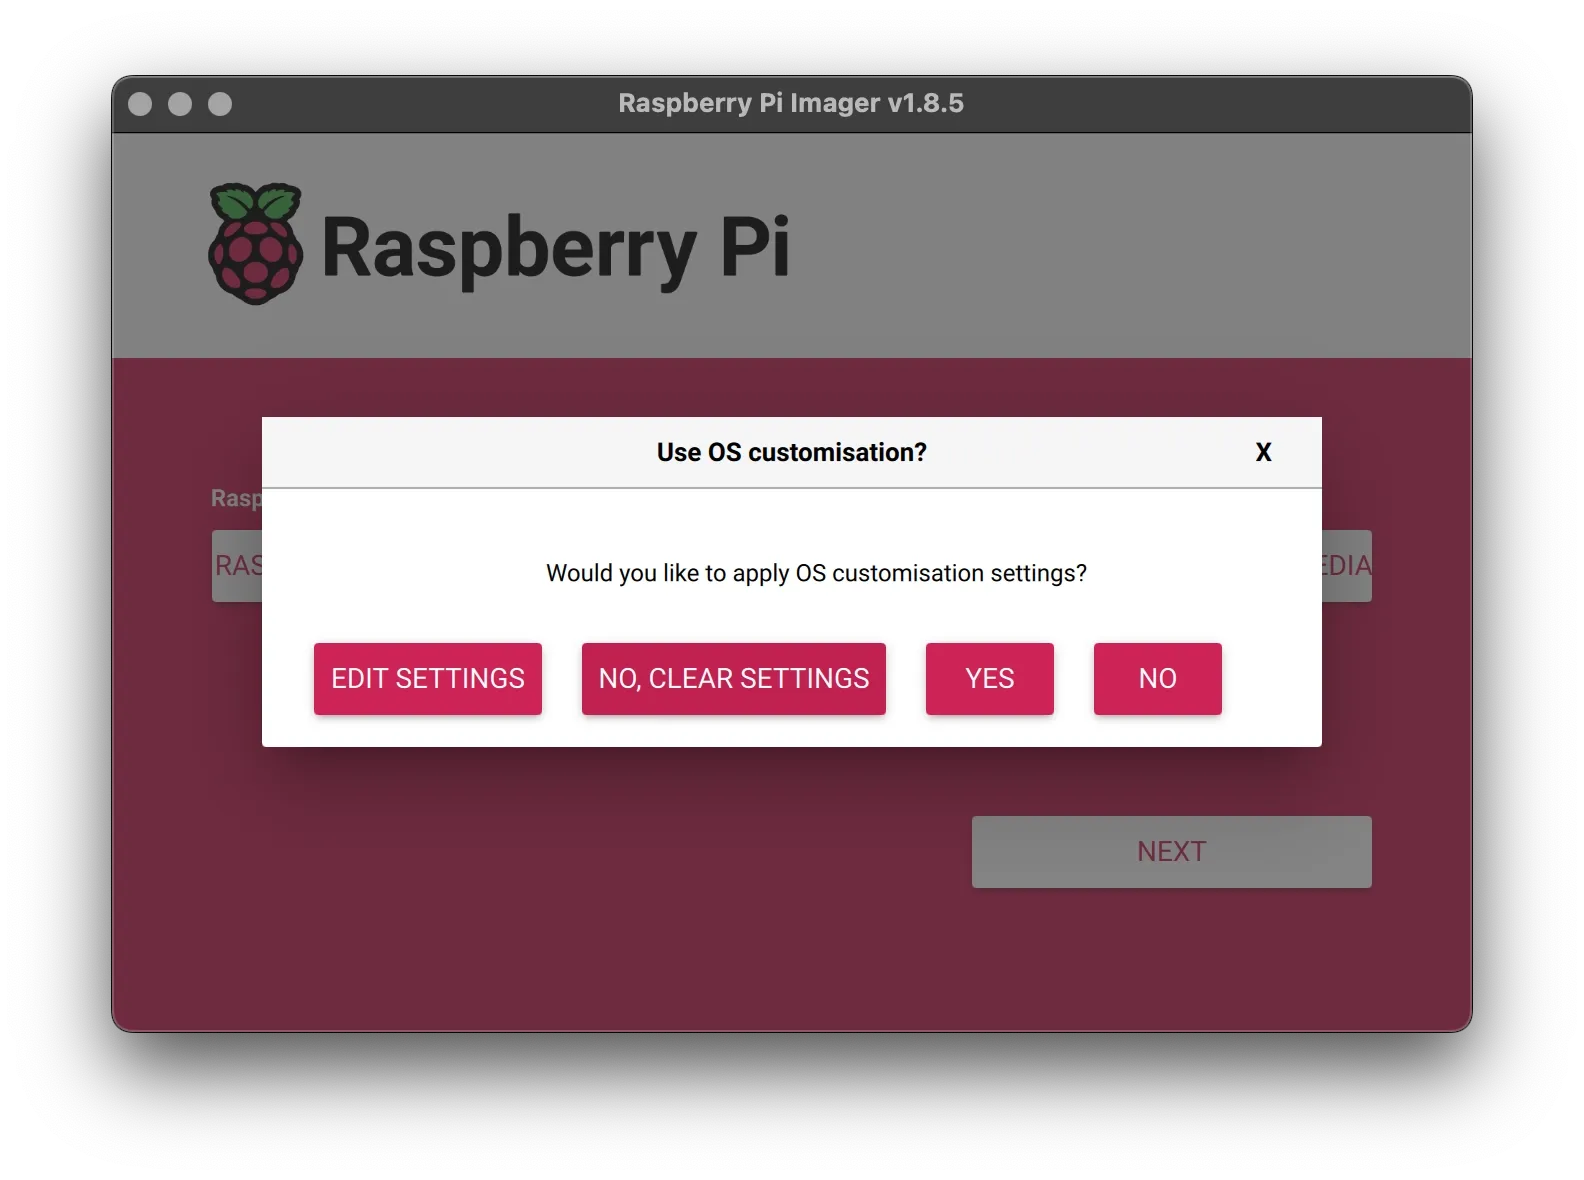
The purpose of a headless setup is to skip the Welcome Wizard and allow you to access your Raspberry Pi remotely right after the first boot, without needing a monitor, keyboard, or mouse. To enable this, you’ll need to configure the username, password, and network settings during the OS customization step in Raspberry Pi Imager.
If you plan to follow our tutorials, we recommend applying these customization settings now. You’ll also need to choose a strong password for security.
To begin, open the Terminal application on your Mac. You can do this by pressing ⌘ and [SPACE] to open Spotlight, then type "Terminal". Alternatively, find it in your Applications folder under Utilities.
Then, enter the following command:
# Generate random passwordopenssl rand -base64 48 | cut -c1-32This command generates a 32-character random password using OpenSSL’s RNG, which follows NIST SP 800-90A/B/C standards and uses ChaCha20 (or AES-CTR in older versions), ensuring cryptographic strength. The output is unpredictable and highly resistant to brute-force attacks. Make sure to save your chosen password in a secure location, such as a password manager. We recommend using KeePassXC, which not only helps you store passwords safely but can also generate strong, random passwords for you.
Avoid using simple or common passwords, this is especially important when enabling remote access.
Next, in Raspberry Pi Imager, click on [Edit Settings] and enter the following parameters under GENERAL:
- Set hostname: term7
- Set username and password
- Username: term7
- Password: Paste the password you generated earlier
- Configure wireless LAN
- SSID: Your-Wifi-SSID
- Password: Your-Wifi-Password
- Wireless LAN country: Your country code (for example, CZ for Czech Republic or FR for France)
- Set locale settings
- Time zone: Choose your local time zone
- Keyboard layout: Choose the layout that matches your keyboard
In the SERVICES section, make sure to:
- Enable SSH
- Choose: "Use password authentication"
SSH is the remote access protocol that allows you to connect to the Raspberry Pi from your Mac’s Terminal over your Wi-Fi network. It is not enabled by default, so be sure to check this option and have both a username and password set.
Finally, you will see a warning that all data on your SD card will be erased. Click [YES] to proceed.
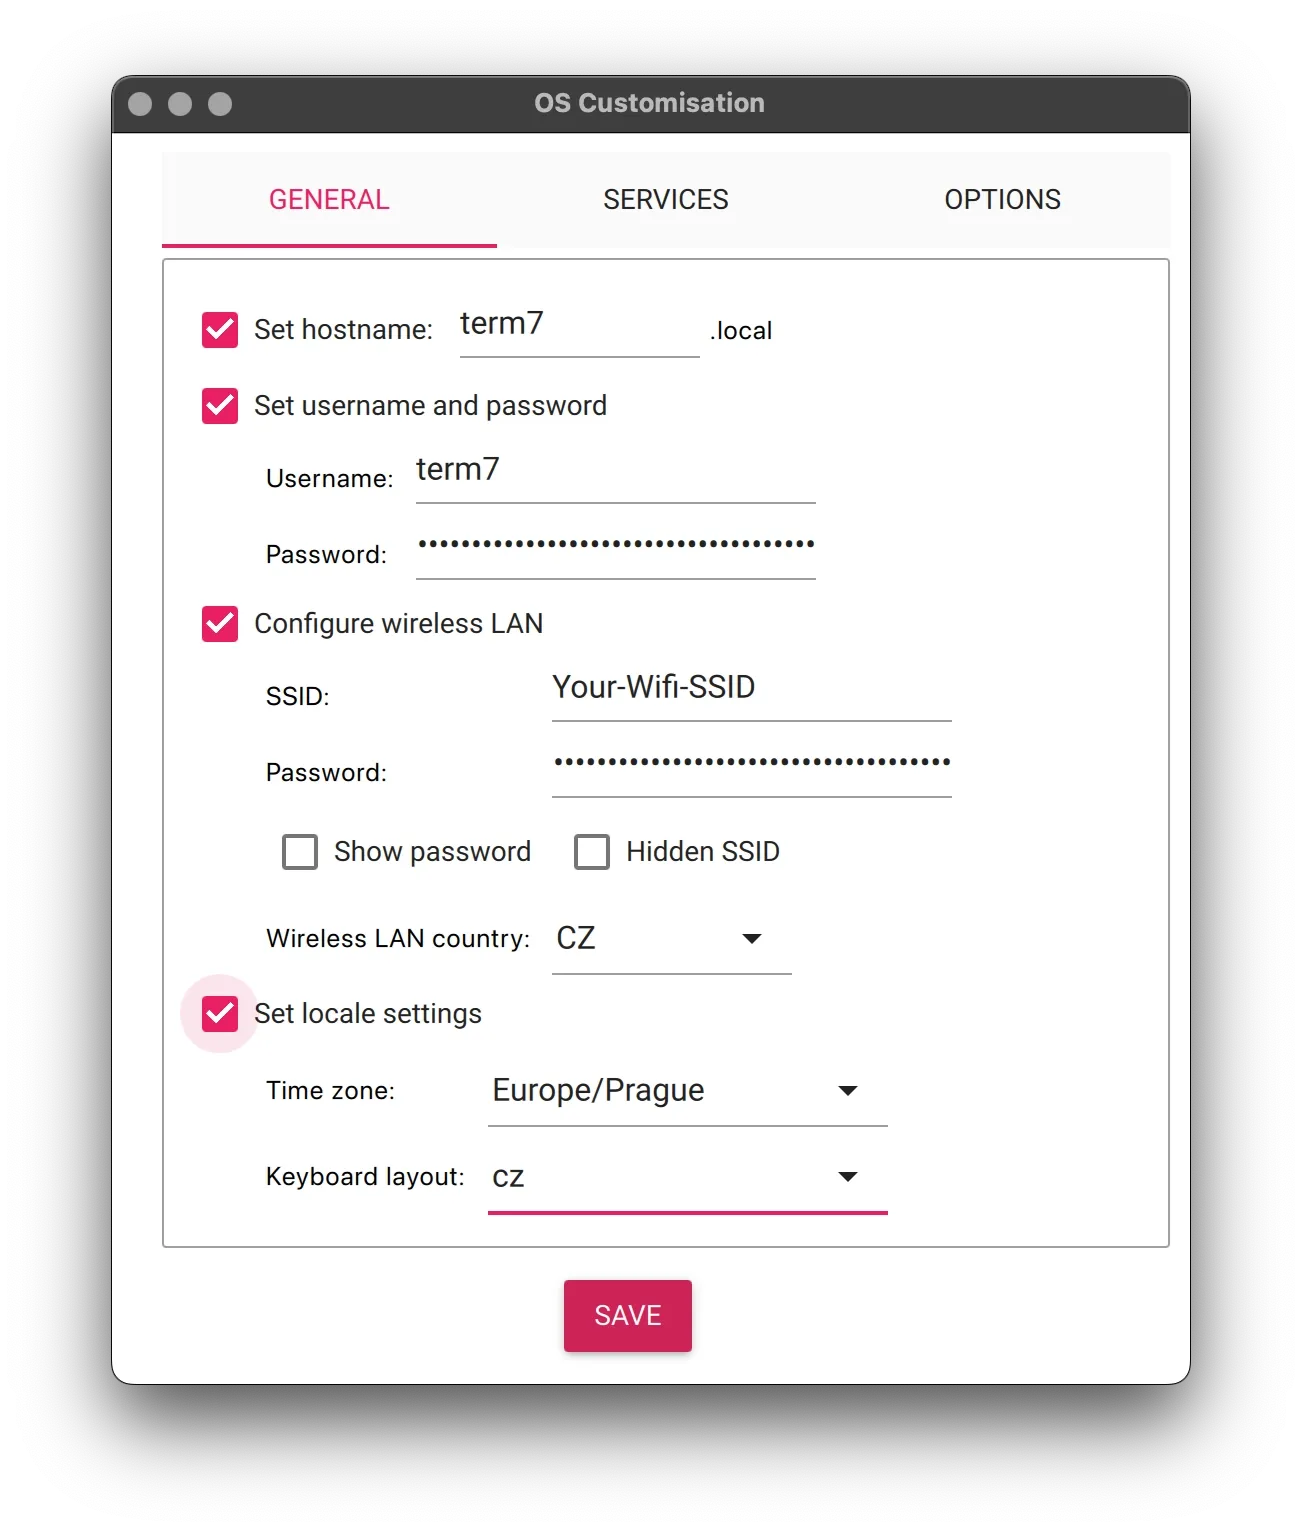
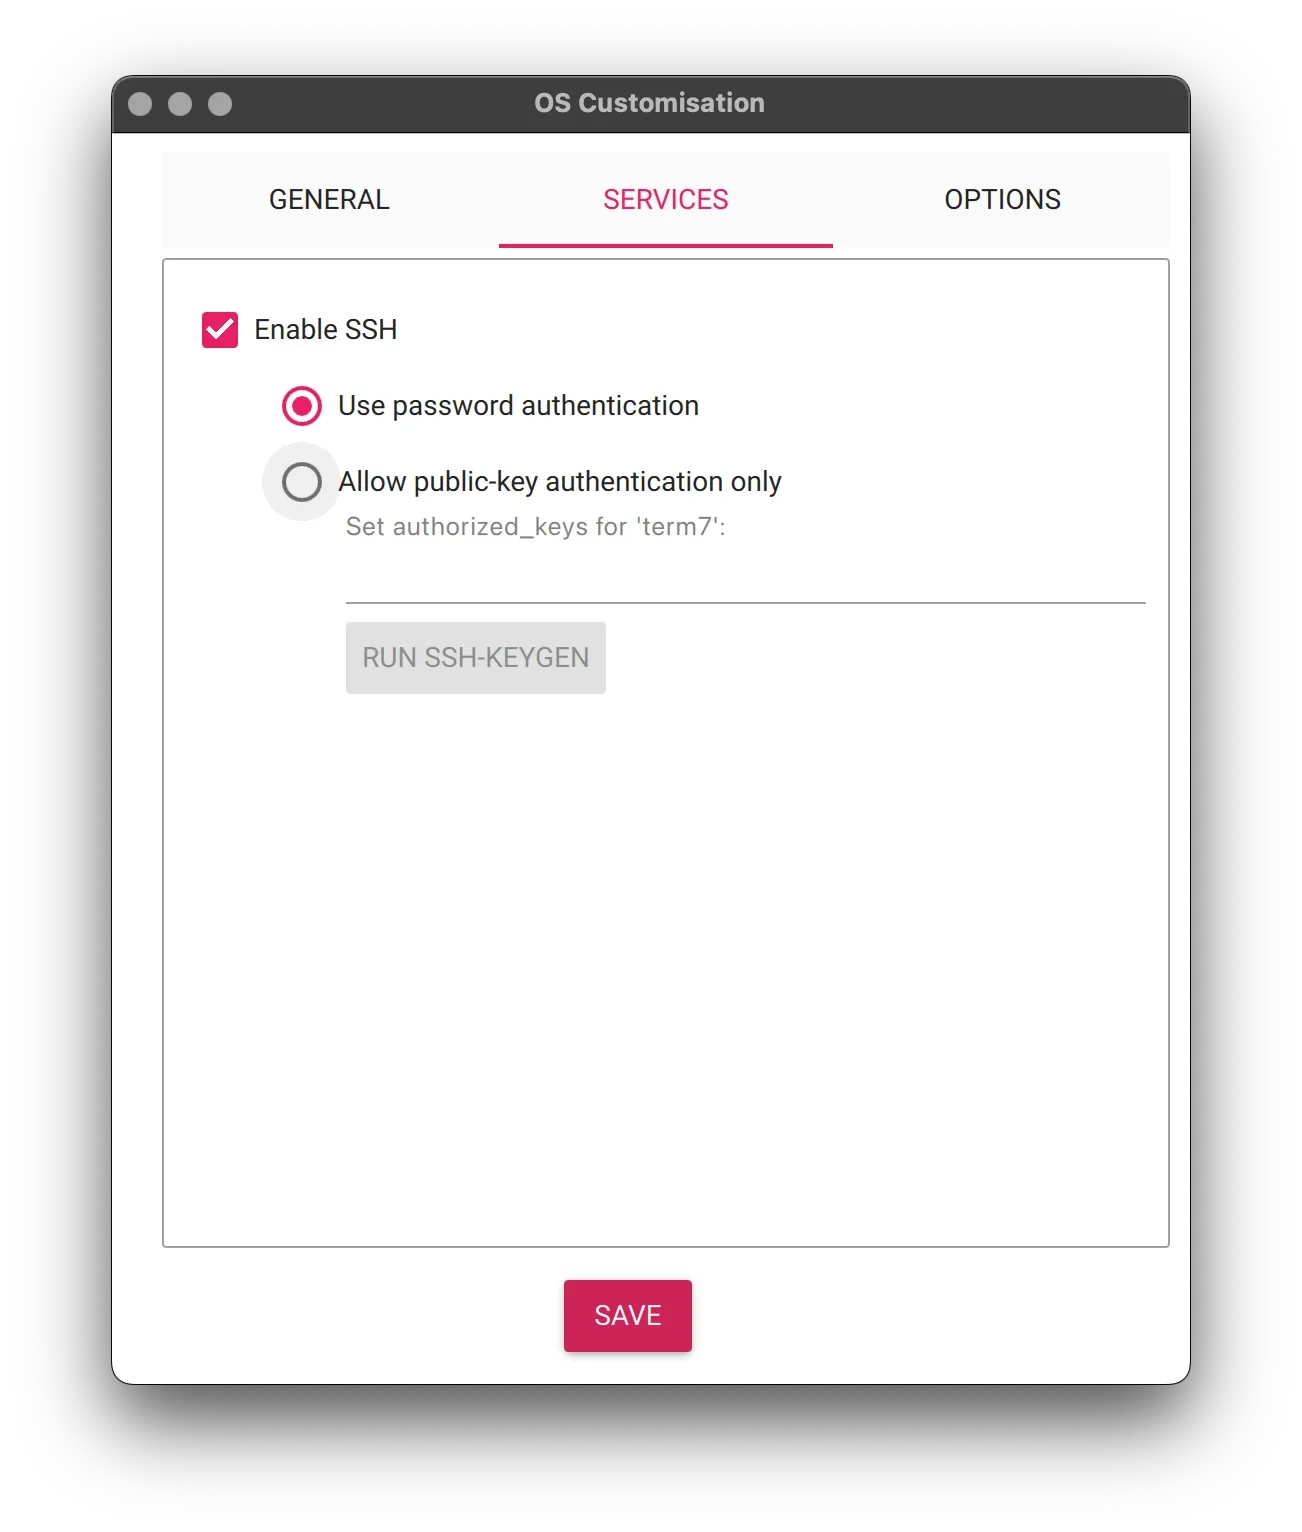
Example Customisation
3 - Boot Up Your Raspberry Pi and Find It on Your Local Network
Insert the microSD card into your Raspberry Pi and connect it to a reliable power supply. The status LEDs on the board will begin blinking as it performs its first-time setup. Be patient: depending on your Raspberry Pi model, this process can take up to 5 minutes to complete.
Important: If your local Wi-Fi network uses the latest WPA3 encryption standard, your Raspberry Pi may not connect automatically during headless setup. We encountered this issue ourselves when testing a Raspberry Pi 3B+ with Raspberry Pi OS (Legacy, 32-bit).
If this happens, you have two options:
- Log in to your router settings and switch Wi-Fi encryption from WPA3 to WPA2.
- Alternatively, connect your Raspberry Pi directly to your router using an Ethernet cable.
Once your Raspberry Pi has finished booting, the next step is to find it on your local network.
The easiest way to do this is by using nmap, a powerful network scanning tool that can list all devices connected to your network.
If you have MacPorts installed on your Mac, you can install nmap by running the following command in Terminal:
Install nmap with MacPorts:
# Install nmap:sudo port install nmapIf you haven’t installed MacPorts yet, don’t worry - we wrote a blog post that walks you through the installation process step by step. You can find it here:
 term7
term7
Once you’ve installed nmap, open Terminal and run the following command to list all devices connected to your local network:
# List all connected devices:
sudo nmap -sP 192.168.1.0/24
This will produce a list of scan reports from devices on your network. Look for a report that includes a MAC address followed by the label "Raspberry Pi Foundation" - this is your Raspberry Pi.
You’ll need the IP address listed next to that entry for the next step. In our example, it might look something like: Nmap scan report for 192.168.1.123

Alternatively, if you prefer not to use nmap, you can also log into your router's admin interface and look up the local IP address assigned to your Raspberry Pi there. Most routers have a section showing all connected devices.
4 - Connect to your Raspberry Pi via SSH
Once you have the IP address of your Raspberry Pi, open Terminal and run the following command (replace the IP address with your actual one):
# Use your own local IP Address, i.e.:ssh term7@192.168.1.123The first time you connect, your Mac will display a security warning: The authenticity of host '192.168.1.123 (192.168.1.123)' can't be established. This is completely normal. Type Yes and press [ENTER] to continue.
You’ll then be prompted to enter the password you created earlier during the Raspberry Pi OS customization step. After entering it, you should be logged in.
Congratulations! You're now connected to your Raspberry Pi via SSH!
SECURITY
initial configuration
0 - Update Your System
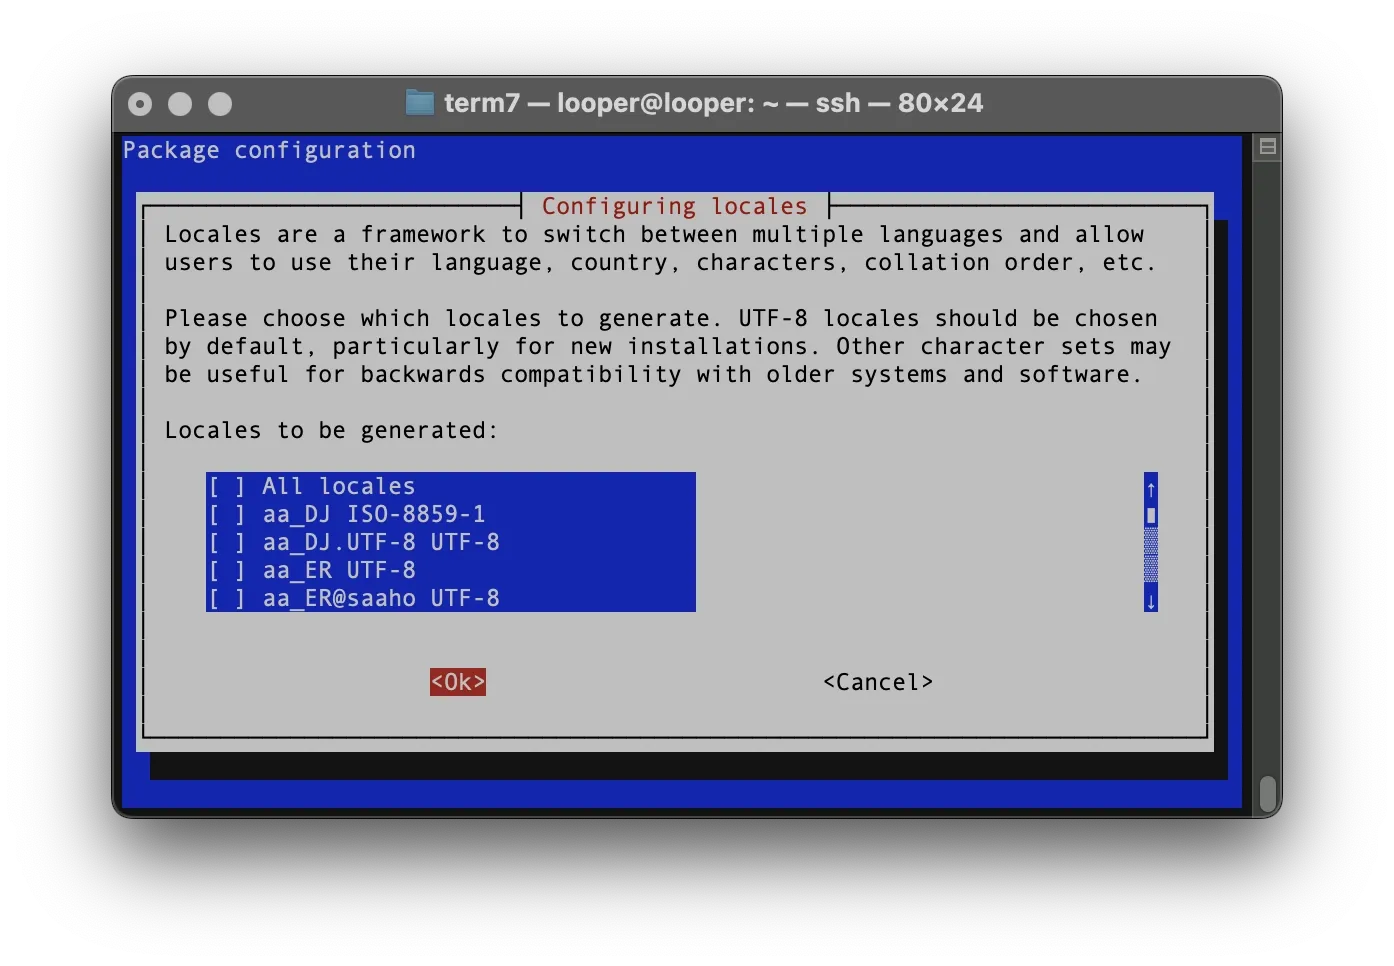
Before updating Raspberry Pi OS, it's a good idea to configure the locale settings. This helps prevent annoying warning messages during updates, especially if you're using English as your preferred language.
First, set the correct locale environment variables by entering the following command in Terminal:
Set locale environment variables:
export LANGUAGE="en_GB.UTF-8" && export LANG="en_GB.UTF-8" && export LC_ALL="en_GB.UTF-8"
Next, run the locale configuration tool:
Configure system locales:
sudo dpkg-reconfigure locales
The configuration interface will appear. Simply press OK twice and hit [ENTER] to proceed with the defaults.

Now, open the locale configuration file using the nano text editor:
Edit locale file:
sudo nano /etc/default/locale
In the editor, add the following lines at the end of the file:
LC_ALL=en_GB.UTF-8
LANGUAGE=en_GB.UTF-8
Your file should now look similar to this:
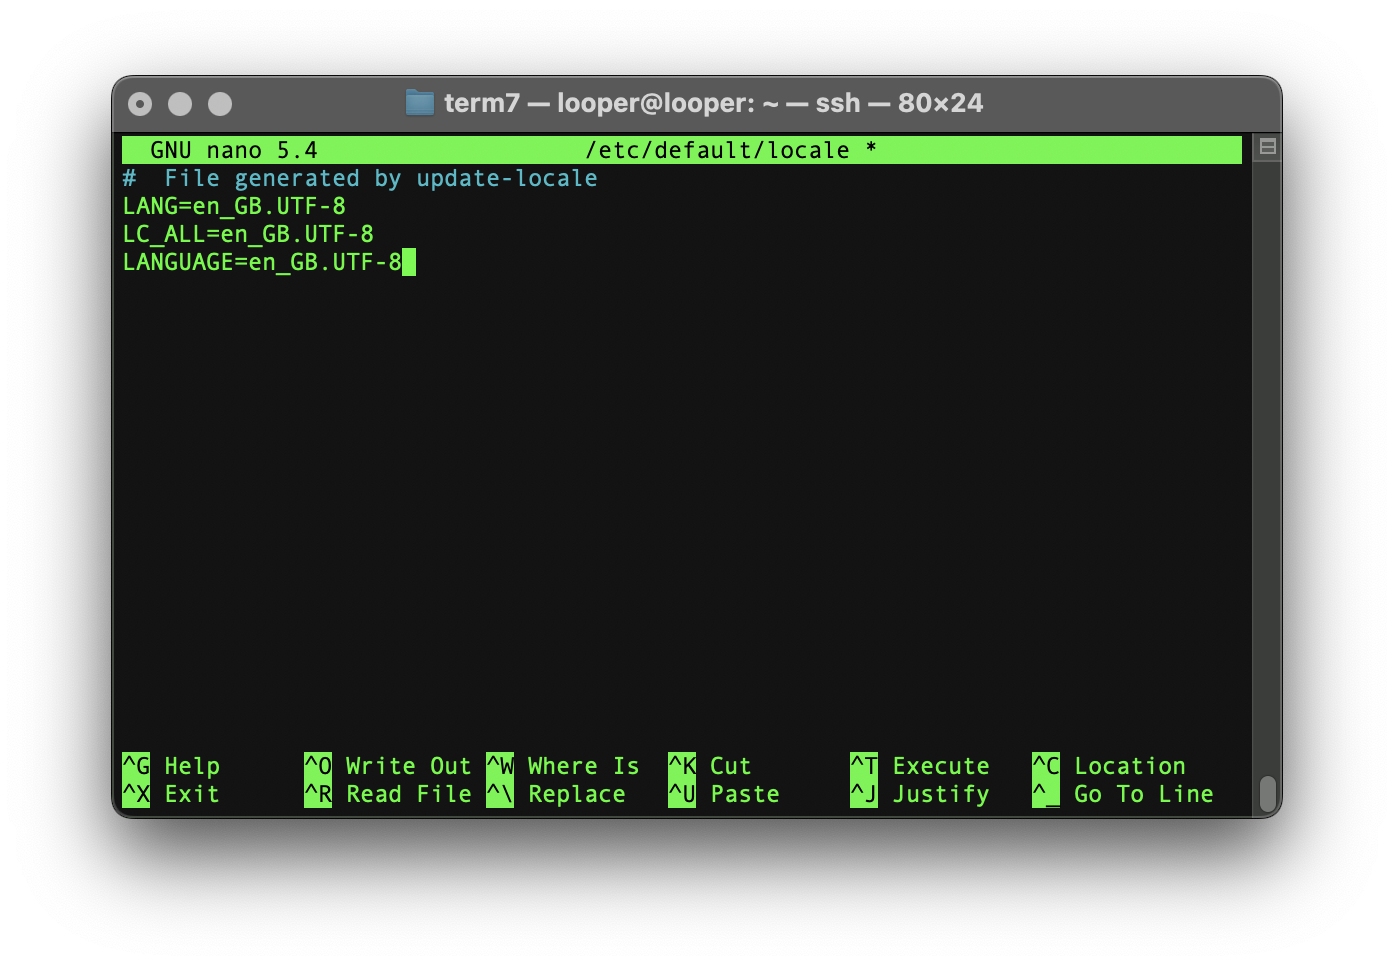
To save and exit nano, press [Control] + X to exit. Then press Y to confirm the changes, followed by [ENTER] to close the editor.
Now you're ready to update the system. Enter the following command to fetch and install updates:
Update the system:
sudo apt update && sudo apt upgrade -y
After the upgrade is complete, clean up any packages that are no longer needed:
Remove unnecessary packages:
sudo apt autoremove -y
Confirm with Y and press [ENTER].
1 - Create Separate Admin and Login User Accounts
In many of our projects, the Raspberry Pi needs to be connected to the internet. For security reasons, we want to limit remote access as much as possible, especially for users with administrative privileges. This is why we establish separate admin and standard user accounts, following best security practices to limit privileges and reduce risks. The admin account (admin) is reserved for system maintenance and configuration, while the standard user account (term7) is used for everyday tasks with minimal permissions.
By enforcing the principle of least privilege (PoLP), we enhance security and minimize potential attack vectors: This setup allows us to disable root login via SSH, adding an extra layer of defense. Even if an attacker manages to gain access, they won’t have admin rights by default, significantly reducing the risk of system compromise.
To create a dedicated admin account, run the following command:
sudo adduser adminThe only required detail is a strong password as we described already in 2 - FLASH RASPBERRY PI OS.
Once the admin user is created, add it to all essential groups to ensure it has access to required system functions:
sudo usermod -a -G adm,tty,dialout,cdrom,audio,video,plugdev,games,users,input,netdev,gpio,i2c,spi,sudo,term7 adminEdit the sudoers configuration file with nano:
sudo nano /etc/sudoers.d/010_pi-nopasswdChange the name of from term7 to admin. Once you finished to edit the file, press [control] + X. Press Y to confirm the changes, press [ENTER] to close nano:
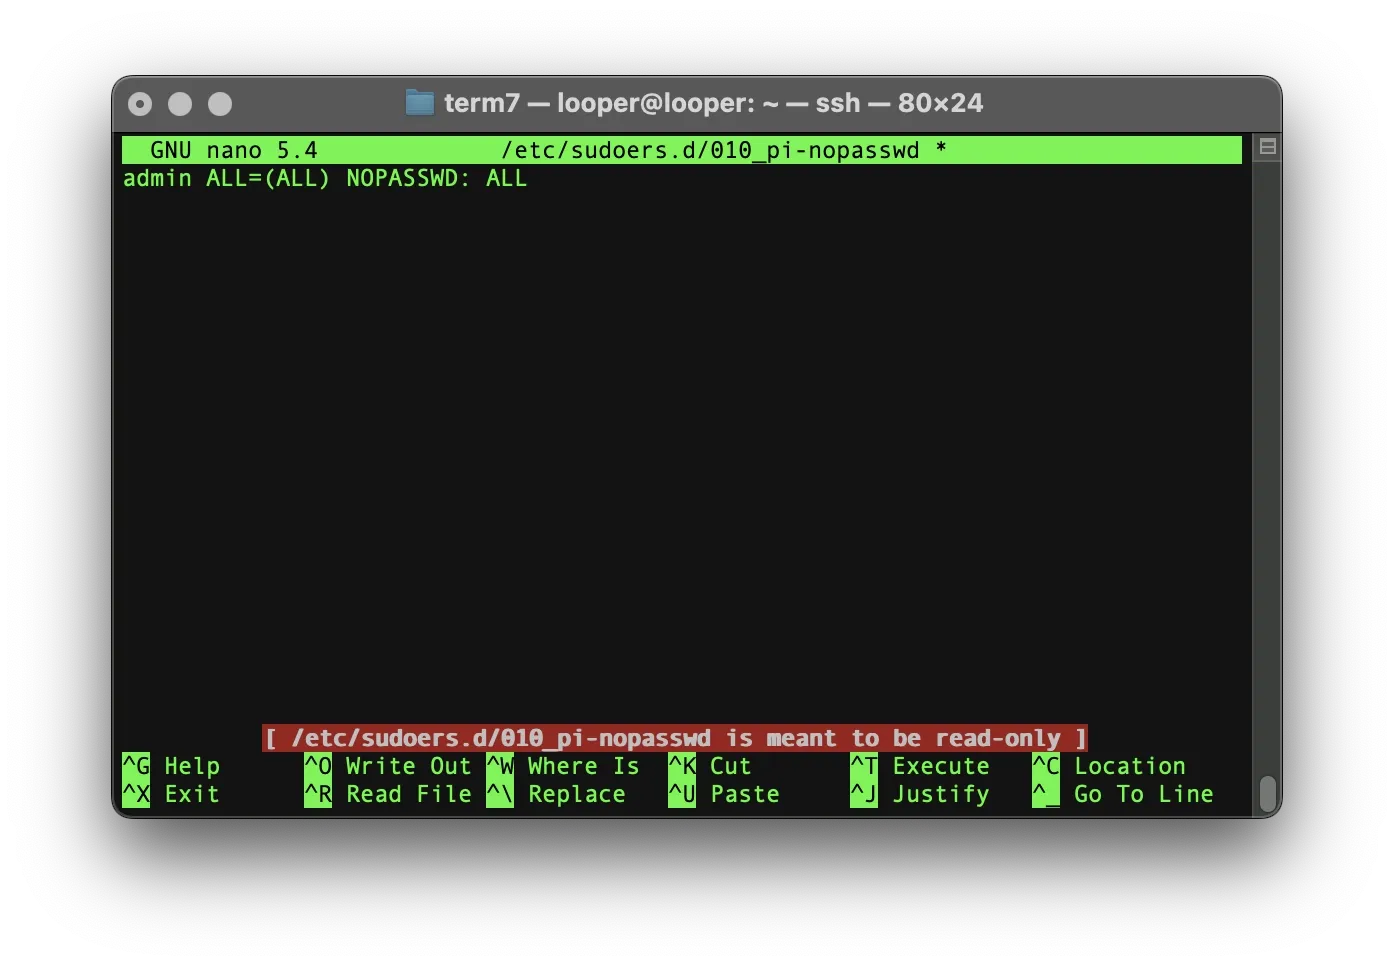
To enhance security even further, ensure that sudo now requires a password:
sudo sed -i 's/NOPASSWD: //g' /etc/sudoers.d/010_pi-nopasswdThis command will remove NOPASSWD: ALL from the configuration file.
To enhance security, we will remove our standard user (term7 in this example) from the sudo group, ensuring it no longer has administrative privileges. First, log in as the new admin user:
su adminEnter your strong password and press [ENTER].
Now, execute the following command to remove term7 from the sudo group (replace term7 with your actual standard username):
sudo deluser term7 sudoAlthough term7 no longer has full sudo access, we want to allow it to reboot and shutdown the Raspberry Pi without switching to admin. Run the following command to create a new sudo policy file:
sudo nano /etc/sudoers.d/common_usersCopy & paste the following content:
# Shutdown and Reboot Policy:term7 ALL = NOPASSWD: /usr/sbin/reboot, /usr/sbin/shutdownAgain, once you finished to edit the file, press [control] + X. Press Y to confirm the changes, press [ENTER] to close nano.
Occasionally, with updates or new distributions of Raspberry Pi OS, the location of system commands like shutdown and reboot may change. To ensure you're using the correct full path, you can run the following commands:
which shutdownwhich rebootChanges will take effect once you reboot your Raspberry Pi:
sudo reboot nowIf you connect to your Raspberry Pi via SSH using your standard (term7) user account, and then try to run a command with sudo, you’ll notice that it doesn’t work. This is expected behavior.
Since this user is not part of the sudo group, they do not have administrative privileges. This setup improves security by ensuring that even if your remote credentials are compromised, critical system-level changes cannot be made through that account.
The admin account should only be used locally or under controlled conditions when elevated access is necessary.
2 - Harden SSH Security
At this point, it's still possible to access your admin account via SSH. For security reasons, we want to prevent this. Remote access should be limited to non-privileged users, while administrative accounts remain accessible only through controlled, local methods.
To achieve this, we'll now adjust the SSH configuration file to block direct access to admin-level accounts. In addition to that, we’ll make a few general changes to improve the security of SSH connections—such as disabling empty passwords, reducing login timeouts, and limiting login attempts.
These changes help ensure that your Raspberry Pi remains accessible for your workflows while minimizing the risk of unauthorized access from outside your local network:
- Disable Root Login
- Change the Default SSH Port
- Use SSH Key Authentication
- Limit User Access
- Configure Timeout Values & Authetication Sessions
- Enforce Strong Encryption
- Setup Logging
- Configure Warning Banner (Optional)
Start by opening the main SSH configuration file:
sudo nano /etc/ssh/sshd_configMake the following changes:
DISABLE ROOT LOGIN
To reduce the attack surface, prevent direct SSH access to your admin account. This helps ensure that administrative privileges remain local only.
# Disable Root Login:
PermitRootLogin no
CHANGE THE DEFAULT SSH PORT
The default SSH port (22) is frequently targeted by automated attacks. Switching to a non-standard port significantly reduces unwanted login attempts.
# Change the port number:
Port 6666# Choose a number between 1024 and 65535
Important: After changing the SSH port, you must specify it when connecting to your Raspberry Pi!
# Replace the IP Address with your own local IP Address
# Add your custom SSH Port:

ssh term7@192.168.1.123 -p 6666
USE SSH KEY AUTHENTICATION
SSH keys provide a much stronger layer of security than passwords. A key pair consists of a private key (which stays on your Mac) and a public key (which is placed on your Raspberry Pi). Only devices with the matching private key can access the Pi.
To generate a new set of SSH keys, open a Terminal on your Mac and run:
# Generate SSH keys:
ssh-keygen -t ed25519 -C "your_email@example.com"
It uses the Ed25519 algorithm, which is faster and more secure than RSA. Please use your real email for reference.
To copy the public key to your Raspberry Pi, run this command, replacing 192.168.1.123 with your Raspberry Pi’s actual local IP address:
# Copy public key to your Raspberry Pi
ssh-copy-id -i ~/.ssh/id_ed25519.pub term7@192.168.1.123
If ssh-copy-id is not installed on macOS, manually copy the key using:
# Copy public key to your Raspberry Pi
cat ~/.ssh/id_ed25519.pub | ssh term7@192.168.1.123 'mkdir -p ~/.ssh && cat >> ~/.ssh/authorized_keys'
Still on your Mac, edit your SSH configuration file:
# Edit ~/.ssh/config:nano ~/.ssh/configMake sure this line is present:
# IdentityFileIdentityFile ~/.ssh/id_ed25519You can now close this Terminal window. Back in your initial Terminal window (where you should still be logged into your Raspberry Pi), change these settings:
# In /etc/ssh/sshd_config, disable Password Authentication:
PasswordAuthentication no
# In /etc/ssh/sshd_config, enable PubKey Authentication:
PubkeyAuthentication yes# In /etc/ssh/sshd_config, define AuthorizedKeysFile:
AuthorizedKeysFile .ssh/authorized_keysAdvanced Security
For an even stronger setup, consider using a hardware security key such as a Nitrokey or YubiKey. However, these require additional setup and are beyond the scope of this tutorial. We might cover them in a separate guide in the future.
LIMIT SSH ACCESS TO A SPECIFIC USER
Restricting SSH login to only one standard (non-admin) user helps prevent misuse of elevated accounts:
# Limit User Access:AllowUsers term7SET TIMEOUT VALUES AND LIMIT SESSIONS
To avoid long idle sessions and brute-force attempts, apply sensible timeouts and session limits.
Idle connection timeout:
# Timeout Value 1:
ClientAliveInterval 300
# Timeout Value 2:
ClientAliveCountMax 2Authentication/session limits:
# MaxAuthTries:
MaxAuthTries 2
# MaxSessions:
MaxSessions 2ENFORCE STRONG ENCRYPTION
Upgrade the cryptographic settings used during SSH sessions to enforce modern, secure algorithms:
# Encryption Algorithms:
Ciphers chacha20-poly1305@openssh.com,aes256-gcm@openssh.com
KexAlgorithms curve25519-sha256@libssh.org,diffie-hellman-group16-sha512
MACs hmac-sha2-512-etm@openssh.com
ENABLE SSH LOGGING
Enable verbose logging to monitor login attempts and detect suspicious activity:
# Setup Logging:
LogLevel VERBOSE
To view recent SSH access logs:
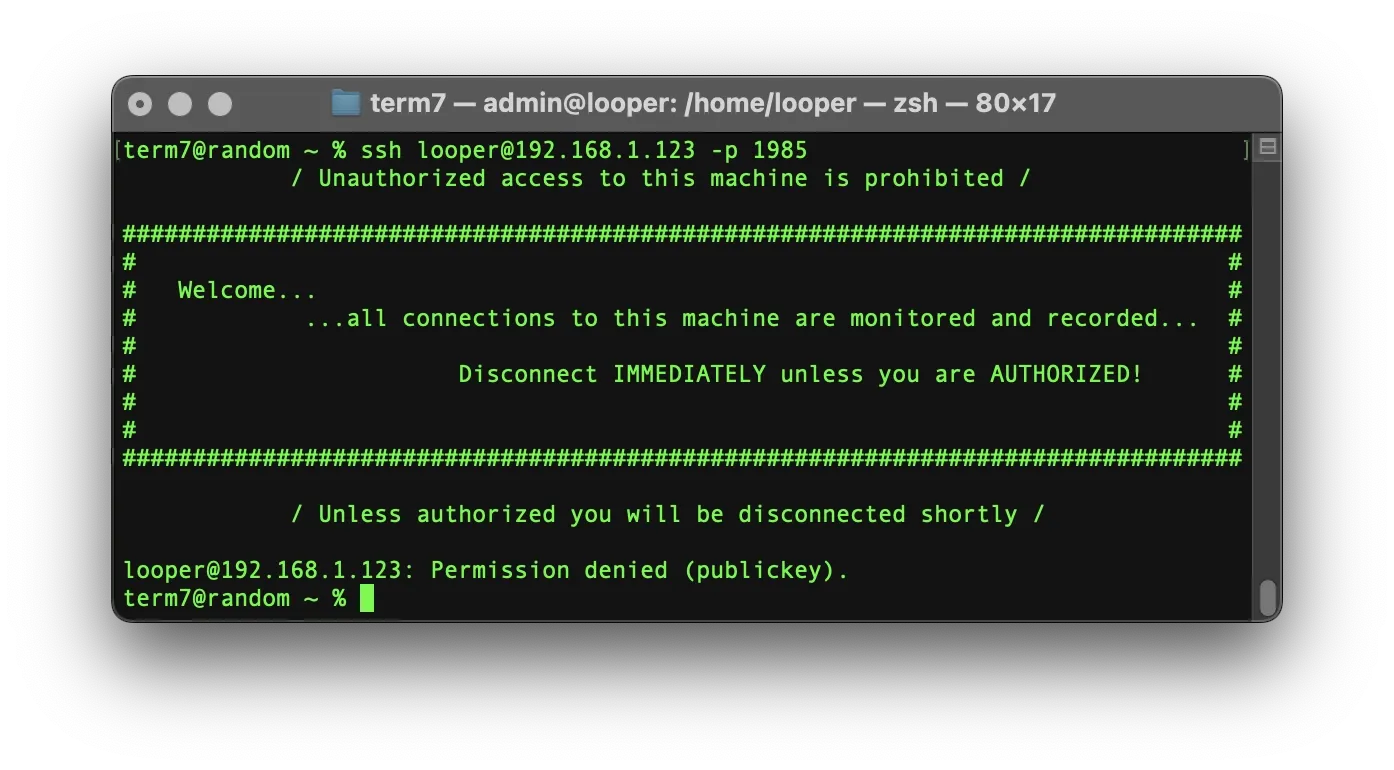
sudo journalctl -u sshOPTIONAL: CONFIGURE WARNING BANNER
A warning banner makes it clear to unauthorized users that access is restricted and monitored. In your SSH config file, set:
# Default Banner Path:
Banner /etc/issue.net
Once all edits are complete, save the configuration file. Press [Control] + X to exit. Then press Y to confirm the changes, followed by [ENTER] to save the configuration.
Then edit the banner content:
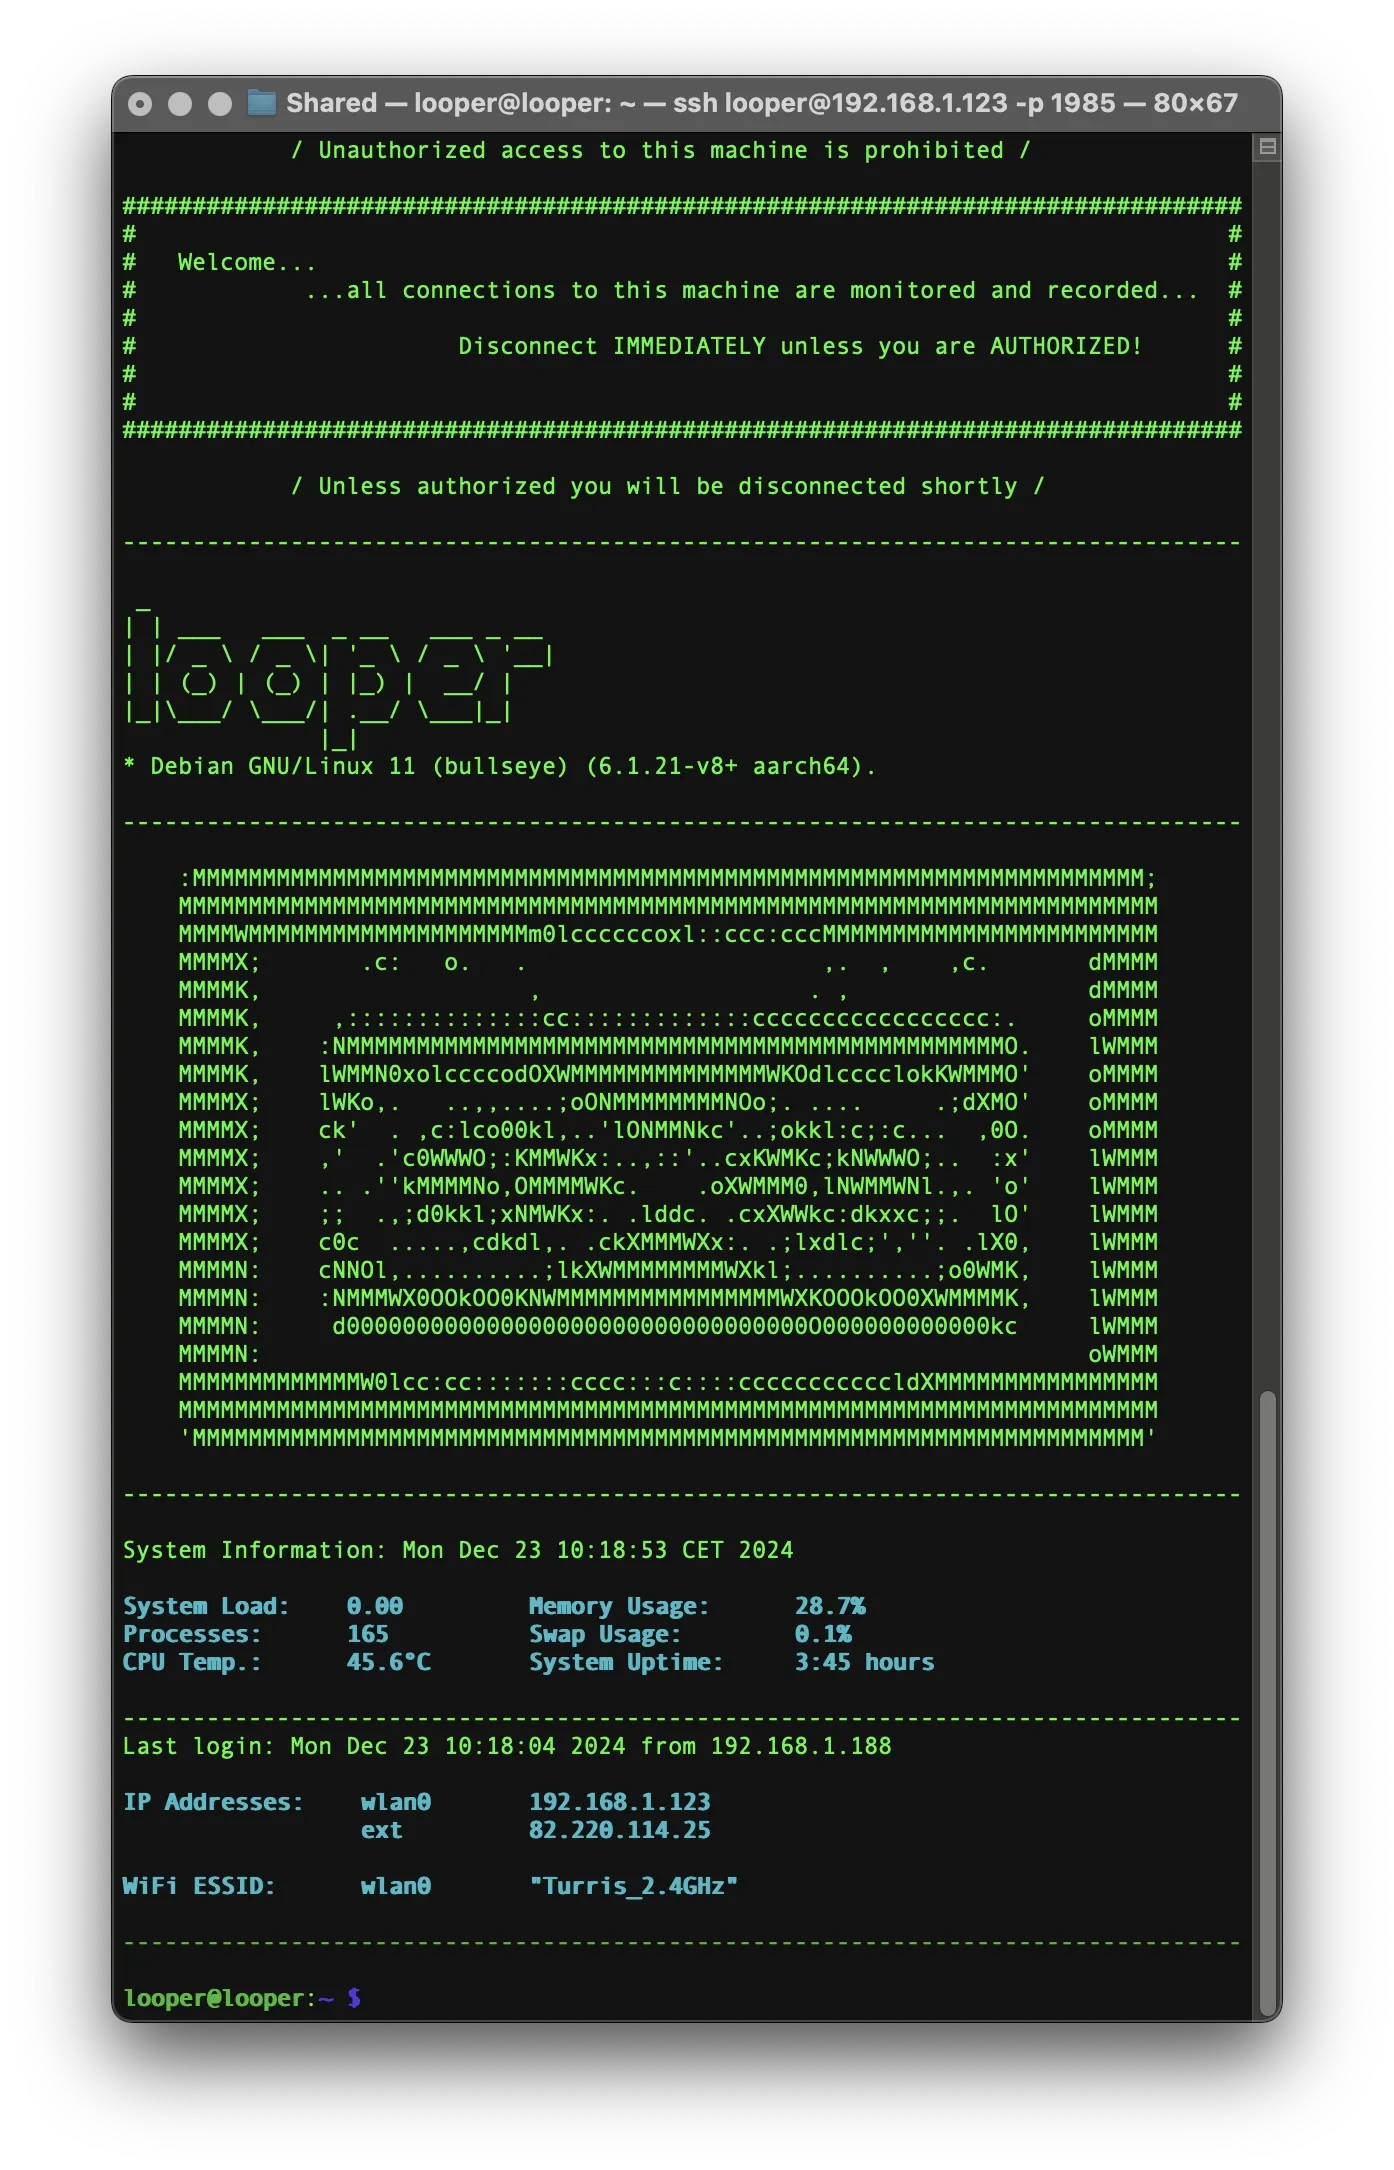
sudo nano /etc/issue.netExample warning message:
            / Unauthorized access to this machine is prohibited /

################################################################################
#                                                                              #
#   Welcome...                                                                 #
#            ...all connections to this machine are monitored and recorded...  #
#                                                                              #
#                       Disconnect IMMEDIATELY unless you are AUTHORIZED!      #
#                                                                              #
#                                                                              #
################################################################################

            / Unless authorized you will be disconnected shortly /
To save, press [control] + X again. Then press Y to confirm the changes and [ENTER] to close nano.
Now restart the SSH service:
# Restart SSH:
sudo systemctl restart sshd
Final Tip: If you're unsure about any of the changes or want a reference, feel free to copy our full sample configuration file (provided below in the blog). Be sure to adjust usernames and port numbers to match your specific setup. Mistakes here could lock you out of your Raspberry Pi!
sudo nano /etc/ssh/sshd_config
# This is the sshd server system-wide configuration file.  See
# sshd_config(5) for more information.

# This sshd was compiled with PATH=/usr/bin:/bin:/usr/sbin:/sbin

# The strategy used for options in the default sshd_config shipped with
# OpenSSH is to specify options with their default value where
# possible, but leave them commented.  Uncommented options override the
# default value.

Include /etc/ssh/sshd_config.d/*.conf

Port 6666
#AddressFamily any
#ListenAddress 0.0.0.0
#ListenAddress ::

#HostKey /etc/ssh/ssh_host_rsa_key
#HostKey /etc/ssh/ssh_host_ecdsa_key
#HostKey /etc/ssh/ssh_host_ed25519_key

# Ciphers and keying
#RekeyLimit default none
Ciphers chacha20-poly1305@openssh.com,aes256-gcm@openssh.com
KexAlgorithms curve25519-sha256@libssh.org,diffie-hellman-group16-sha512
MACs hmac-sha2-512-etm@openssh.com

# Logging
#SyslogFacility AUTH
LogLevel VERBOSE

# Authentication:

#LoginGraceTime 2m
PermitRootLogin no
AllowUsers term7
#StrictModes yes
MaxAuthTries 2
MaxSessions 2

PubkeyAuthentication yes

# Expect .ssh/authorized_keys2 to be disregarded by default in future.
AuthorizedKeysFile	.ssh/authorized_keys

#AuthorizedPrincipalsFile none

#AuthorizedKeysCommand none
#AuthorizedKeysCommandUser nobody

# For this to work you will also need host keys in /etc/ssh/ssh_known_hosts
#HostbasedAuthentication no
# Change to yes if you don't trust ~/.ssh/known_hosts for
# HostbasedAuthentication
#IgnoreUserKnownHosts no
# Don't read the user's ~/.rhosts and ~/.shosts files
#IgnoreRhosts yes

# To disable tunneled clear text passwords, change to no here!
PasswordAuthentication no
#PermitEmptyPasswords no

# Change to yes to enable challenge-response passwords (beware issues with
# some PAM modules and threads)
ChallengeResponseAuthentication no

# Kerberos options
#KerberosAuthentication no
#KerberosOrLocalPasswd yes
#KerberosTicketCleanup yes
#KerberosGetAFSToken no

# GSSAPI options
#GSSAPIAuthentication no
#GSSAPICleanupCredentials yes
#GSSAPIStrictAcceptorCheck yes
#GSSAPIKeyExchange no

# Set this to 'yes' to enable PAM authentication, account processing,
# and session processing. If this is enabled, PAM authentication will
# be allowed through the ChallengeResponseAuthentication and
# PasswordAuthentication.  Depending on your PAM configuration,
# PAM authentication via ChallengeResponseAuthentication may bypass
# the setting of "PermitRootLogin without-password".
# If you just want the PAM account and session checks to run without
# PAM authentication, then enable this but set PasswordAuthentication
# and ChallengeResponseAuthentication to 'no'.
UsePAM yes

#AllowAgentForwarding yes
#AllowTcpForwarding yes
#GatewayPorts no
X11Forwarding yes
#X11DisplayOffset 10
#X11UseLocalhost yes
#PermitTTY yes
PrintMotd no
#PrintLastLog yes
#TCPKeepAlive yes
#PermitUserEnvironment no
#Compression delayed
ClientAliveInterval 300
ClientAliveCountMax 2
#UseDNS no
#PidFile /var/run/sshd.pid
#MaxStartups 10:30:100
#PermitTunnel no
#ChrootDirectory none
#VersionAddendum none

# no default banner path
Banner /etc/issue.net

# Allow client to pass locale environment variables
AcceptEnv LANG LC_*

# override default of no subsystems
Subsystem	sftp	/usr/lib/openssh/sftp-server

# Example of overriding settings on a per-user basis
#Match User anoncvs
#	X11Forwarding no
#	AllowTcpForwarding no
#	PermitTTY no
#	ForceCommand cvs server
3 - setup a Firewall
To further secure your Raspberry Pi, we use nftables as a firewall to control which ports are open and accessible. This helps prevent unauthorized access and reduces the risk of attacks on unused services. Before configuring the firewall, let’s make sure that nftables is installed. On most recent Raspberry Pi OS versions, it comes pre-installed. However, it’s always good to verify.
You can check whether nftables is available and install it if necessary.
# Install nftables:
sudo apt install -y nftables
To protect your Raspberry Pi from unwanted access, we’ll now configure a firewall using nftables. This ruleset will strictly limit incoming traffic, while still allowing essential connections like SSH and ICMP (ping).
Start by editing the default configuration file:
sudo nano /etc/nftables.confReplace the content with the following configuration:
####################
# Purge/Flush      #
####################
flush ruleset

####################
# Incoming Traffic #
####################
table inet filter {
   chain input {
      type filter hook input priority 0; policy drop;

      # Allow packets to established/related connections
      ct state established,related accept

      # Drop invalid connections
      ct state invalid drop

      # Allow loopback interface
      iifname lo accept

      # Allow ICMPv4: Ping requests | Error messages | Router selection messages
      ip protocol icmp icmp type { echo-request, echo-reply, destination-unreachable, time-exceeded, parameter-problem, router-solicitation, router-advertisement } accept

      # Allow ICMPv6 traffic (https://tools.ietf.org/html/rfc4890#page-18)
      ip6 nexthdr icmpv6 icmpv6 type { destination-unreachable, packet-too-big, time-exceeded, echo-request, parameter-problem, echo-reply, nd-router-solicit, nd-router-advert, nd-neighbor-solicit, nd-neighbor-advert, ind-neighbor-solicit, ind-neighbor-advert } accept

      # Allow SSH and protect SSH against brute-force attacks
      limit rate 3/minute tcp dport 6666 accept

      # Reject other packets
      ip protocol tcp reject with tcp reset
      ip6 nexthdr tcp reject with tcp reset
   }
####################
# Forward Traffic  #
####################
   chain forward {
      type filter hook forward priority 0; policy drop;
   }
####################
# Outgoing Traffic #
####################
   chain output {
      type filter hook output priority 0; policy accept;

      # Allow loopback interface
      oifname lo accept
   }
}
Once you've pasted the configuration, save and exit the editor:
Press [Control] + X, then Y, and press [ENTER].
Next, enable and start nftables so the firewall is active and persistent after reboot:
sudo systemctl enable nftablessudo systemctl start nftablesThis ruleset is a great starting point for a hardened Raspberry Pi. It:
- Drops all unexpected inbound connections by default
- Allows only trusted traffic (such as SSH on your custom port)
- Protects against brute-force login attempts with basic rate limiting
- Maintains outgoing connectivity for updates and web access
- Supports both IPv4 and IPv6 traffic where needed
Your Raspberry Pi is now protected by a proper firewall, without relying on external tools or extra complexity.
Disable IPv6 (optional)
IPv6 can be useful in certain network environments, but if you don’t need it, we recommend disabling it for security and simplicity. IPv6 is often considered less mature in terms of firewalling and exposure management, especially in smaller or home network setups.
Edit the system configuration file:
# Disable IPv6:
sudo nano /etc/sysctl.conf
At the end of the file, insert the following lines:
# Insert:
#Disable IPv6:

net.ipv6.conf.all.disable_ipv6 = 1
net.ipv6.conf.default.disable_ipv6 = 1
net.ipv6.conf.lo.disable_ipv6 = 1
Save and exit by pressing [Control] + X, then Y, and [ENTER].
These changes will take effect after the next reboot. If you'd like them to apply immediately, use the command:
sudo sysctl -pOn some systems, you may also need to modify the boot configuration file:
# Disable IPv6:
sudo nano /boot/firmware/cmdline.txt
Append the following parameter to the end of the existing line (do not create a new line):
ipv6.disable=1Save and close the file.
Once IPv6 is disabled, you can remove any local IPv6 entries to prevent resolution delays or unnecessary errors:
sudo sed -i '/::/d' /etc/hostsIf IPv6 is disabled, you should also adjust your nftables firewall to focus exclusively on IPv4 and explicitly block any residual IPv6 traffic.
Edit the firewall configuration:
sudo nano /etc/nftables.confReplace the existing configuration with a ruleset that excludes IPv6 or blocks it completely. You can use the following example, which is specifically tailored for IPv4 and drops all IPv6 packets:
####################
# Purge/Flush      #
####################
flush ruleset

#########################
# Incoming IPv4-Traffic #
#########################
table ip filter {
   chain input {
      type filter hook input priority 0; policy drop;

      # Allow packets to established/related connections
      ct state established,related accept

      # Drop invalid connections
      ct state invalid drop

      # Allow loopback interface
      iifname lo accept

      # Allow ICMPv4: Ping requests | Error messages | Router selection messages
      ip protocol icmp icmp type { echo-request, echo-reply, destination-unreachable, time-exceeded, parameter-problem, router-solicitation, router-advertisement } accept

      # Allow SSH and protect SSH against brute-force attacks
      limit rate 3/minute tcp dport 6666 accept

      # Reject other packets
      ip protocol tcp reject with tcp reset
   }
#########################
# Forward IPv4-Traffic  #
#########################
   chain forward {
      type filter hook forward priority 0; policy drop;
   }
#########################
# Outgoing IPv4-Traffic #
#########################
   chain output {
      type filter hook output priority 0; policy accept;

      # Allow loopback interface
      oifname lo accept
   }
}

####################
# IPv6             #
####################
table ip6 filter {
   chain input {
      type filter hook input priority 0; policy drop;
   }
   chain forward {
      type filter hook forward priority 0; policy drop;
   }
   chain output {
      type filter hook output priority 0; policy drop;
   }
}
Save and exit by pressing [Control] + X, then Y, and [ENTER].
Make sure the firewall is active and persistent after reboot:
sudo systemctl enable nftablessudo systemctl start nftablesThis IPv4-only ruleset is highly secure and perfect for a locked-down system, especially when IPv6 is not required. By removing IPv6 completely, you reduce your attack surface and make your network traffic easier to monitor and control.
SPECIAL THANKS TO MIKE KUKETZ!
A big thank you to Mike Kuketz for his excellent blog (in German), which has been a great source of inspiration. Your work on digital privacy and security is incredibly valuable - keep it up!

4 - fail2ban
To add an extra layer of protection, we use fail2ban. This tool monitors log files for suspicious behavior, such as multiple failed login attempts, and temporarily bans IP addresses that show signs of brute-force attacks.
Fail2ban depends on system logs to detect suspicious activity. On most Raspberry Pi OS installations, logging is already enabled via journald.
First you need to modify your firewall rules. Use this ruleset if you enabled both, IPv4 and IPv6:
####################
# Purge/Flush      #
####################
flush ruleset

####################
# Incoming Traffic #
####################
table inet filter {

    # --- Fail2ban chain ---
    # Create the Fail2ban set
    set f2b-sshd {
        type ipv4_addr
        flags timeout
    }

    # Create the Fail2ban chain that drops packets from IPs in the set
    chain f2b-sshd {
        ip saddr @f2b-sshd drop
    }

   chain input {
      type filter hook input priority 0; policy drop;

      # Allow packets to established/related connections
      ct state established,related accept

      # Drop invalid connections
      ct state invalid drop

      # Allow loopback interface
      iifname lo accept

      # Jump to the Fail2ban chain.
      jump f2b-sshd

      # Allow ICMPv4: Ping requests | Error messages | Router selection messages
      ip protocol icmp icmp type { echo-request, echo-reply, destination-unreachable, time-exceeded, parameter-problem, router-solicitation, router-advertisement } accept

      # Allow ICMPv6 traffic (https://tools.ietf.org/html/rfc4890#page-18)
      ip6 nexthdr icmpv6 icmpv6 type { destination-unreachable, packet-too-big, time-exceeded, echo-request, parameter-problem, echo-reply, nd-router-solicit, nd-router-advert, nd-neighbor-solicit, nd-neighbor-advert, ind-neighbor-solicit, ind-neighbor-advert } accept

      # Allow SSH and protect SSH against brute-force attacks
      limit rate 3/minute tcp dport 6666 accept

      # Reject other packets
      ip protocol tcp reject with tcp reset
      ip6 nexthdr tcp reject with tcp reset
   }
####################
# Forward Traffic  #
####################
   chain forward {
      type filter hook forward priority 0; policy drop;
   }
####################
# Outgoing Traffic #
####################
   chain output {
      type filter hook output priority 0; policy accept;

      # Allow loopback interface
      oifname lo accept
   }
}
Save and exit by pressing [Control] + X, then Y, and [ENTER].
If you disabled IPv6 as described in the previous section, use this firewall configuration instead:
####################
# Purge/Flush      #
####################
flush ruleset

#########################
# Incoming IPv4-Traffic #
#########################
table ip filter {

    # --- Fail2ban chain ---
    # Create the Fail2ban set
    set f2b-sshd {
        type ipv4_addr
        flags timeout
    }

    # Create the Fail2ban chain that drops packets from IPs in the set
    chain f2b-sshd {
        ip saddr @f2b-sshd drop
    }

   chain input {
      type filter hook input priority 0; policy drop;

      # Allow packets to established/related connections
      ct state established,related accept

      # Drop invalid connections
      ct state invalid drop

      # Allow loopback interface
      iifname lo accept

      # Jump to the Fail2ban chain.
      jump f2b-sshd

      # Allow ICMPv4: Ping requests | Error messages | Router selection messages
      ip protocol icmp icmp type { echo-request, echo-reply, destination-unreachable, time-exceeded, parameter-problem, router-solicitation, router-advertisement } accept

      # Allow SSH and protect SSH against brute-force attacks
      limit rate 3/minute tcp dport 6666 accept

      # Reject other packets
      ip protocol tcp reject with tcp reset
   }
#########################
# Forward IPv4-Traffic  #
#########################
   chain forward {
      type filter hook forward priority 0; policy drop;
   }
#########################
# Outgoing IPv4-Traffic #
#########################
   chain output {
      type filter hook output priority 0; policy accept;

      # Allow loopback interface
      oifname lo accept
   }
}

####################
# IPv6             #
####################
table ip6 filter {
   chain input {
      type filter hook input priority 0; policy drop;
   }
   chain forward {
      type filter hook forward priority 0; policy drop;
   }
   chain output {
      type filter hook output priority 0; policy drop;
   }
}
Save and exit by pressing [Control] + X, then Y, and [ENTER].
Next, install fail2ban itself:
# Install fail2ban:
sudo apt install -y fail2ban
Then we need to create a custom Fail2ban Action for nftables:
# Fail2ban Action:
sudo nano /etc/fail2ban/action.d/nftables-ssh.conf
Insert the following:
[Definition]

actionstart =
actionstop =

# When banning an IP, add it to the set with the given bantime.
actionban = /usr/sbin/nft add element inet filter f2b-sshd { <ip> timeout <bantime>s }

# When unbanning an IP, remove it from the set.
actionunban = /usr/sbin/nft delete element inet filter f2b-sshd { <ip> }
Save and exit by pressing [Control] + X, then Y, and [ENTER].
Now we’ll configure fail2ban to monitor SSH activity on your custom port (6666). Edit the default jail configuration:
# Fail2ban SSH Configuration:
sudo nano /etc/fail2ban/jail.d/defaults-debian.conf
Replace the contents with the following:
[sshd]
enabled  = true
port     = 6666
filter   = sshd
backend  = systemd
findtime = 600
maxretry = 2
bantime  = 165600
action   = nftables-ssh[name=sshd, port=6666, protocol=tcp]
This configuration does the following:
- Enables SSH monitoring
- Monitors your custom SSH port (6666)
- Logs activity from systemd
- Bans IPs after 2 failed login attempts
- Defines a detection window of 10 minutes (600 seconds)
- Blocks offending IPs for 48 hours
Save and close the file:
Press [Control] + X, then Y, and [ENTER].
Fail2ban will now automatically monitor SSH access and help keep your Raspberry Pi safe from brute-force attacks.
5 - Unattended Upgrades
Keeping your Raspberry Pi up to date is essential for security and stability. Fortunately, this can be automated using unattended upgrades, which will automatically install important updates in the background. First, install the necessary tools:
# Install unattended-upgrades and apt-listchanges:
sudo apt install -y unattended-upgrades apt-listchanges
Next, open the main configuration file:
# Edit 50unattended-upgrades:
sudo nano /etc/apt/apt.conf.d/50unattended-upgrades
Find the following line: "origin=Debian,codename=${distro_codename}-security,label=Debian-Security";
Just below it, insert these two additional lines:
Insert:
        "origin=Raspbian,codename=${distro_codename},label=Raspbian";
        "origin=Raspberry Pi Foundation,codename=${distro_codename},label=Raspberry Pi
These lines ensure that updates provided by the Raspberry Pi Foundation and Raspbian project are included in the automatic updates. Debian security updates are already handled by default.
Also uncomment this line by removing "//" to include Debian updates:
# Uncomment:
//      "origin=Debian,codename=${distro_codename},label=Debian";
To automatically remove unused dependencies, find and change the following line: "//Unattended-Upgrade::Remove-Unused-Dependencies "false";
Change it to:
# Edit:
Unattended-Upgrade::Remove-Unused-Dependencies "true";
Save the file:
Press [Control] + X, then Y, and [ENTER].
To confirm that everything is working, run:
# Test unattended upgrades:
sudo unattended-upgrade -d
This will simulate the upgrade process and show what would be installed.
TWEAKS
performance tweaks and simple tools
0 - Z-RAM
ZRAM creates a block device in memory (/dev/zram0, /dev/zram1, etc.), where data is compressed and stored. This results in significantly faster I/O performance and effectively increases available memory thanks to compression.
We enable ZRAM on all of our Raspberry Pi systems because it noticeably boosts overall performance, especially on devices with limited RAM.
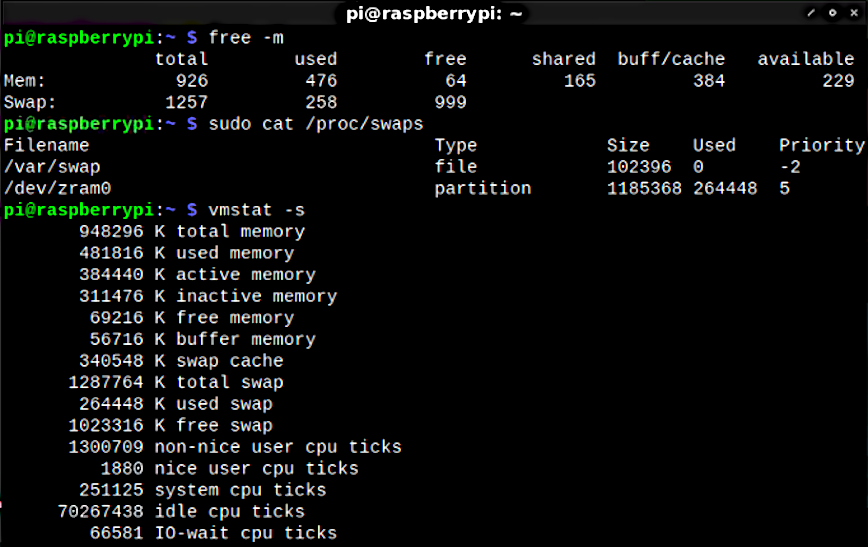
To view your current memory and swap usage:
free -mYou'll need git to clone the ZRAM setup script. If it's not already installed:
# Install git:
sudo apt install -y git
We use Github repository: zram-swap script. Clone the script repository into a build directory:
# Create build folder:
[ -d ~/build ] || mkdir ~/build && cd ~/build
# Clone the Script:
git clone https://github.com/foundObjects/zram-swapNavigate into the script directory and run the install script:
# Install ZRAM:
cd zram-swap && sudo ./install.sh
If you want to tweak how ZRAM behaves, you can modify its config file:
# Edit Configuration:sudo nano /etc/default/zram-swapTo delay running out of memory and improve caching and swapping behavior (now much faster thanks to ZRAM), adjust your kernel parameters:
Edit sysctl configuration:
# Edit /etc/sysctl.conf:
sudo nano /etc/sysctl.conf
Add the following lines at the end of the file:
#Z-RAM tweaks:

vm.vfs_cache_pressure=500
vm.swappiness=100
vm.dirty_background_ratio=1
vm.dirty_ratio=50
These settings increase the system’s tendency to swap, optimize cache behavior, and improve how dirty memory is handled.
To activate the new settings without rebooting, run:
sudo sysctl -pAlternatively, reboot your Raspberry Pi.
To confirm that ZRAM is running, check your Raspberry Pi’s memory again with:
free -m

Raspberry Pi 3B+ before and after installing Z-RAM
You should now see swap space listed, even though no physical swap file or partition was created. This swap is actually stored in compressed memory via ZRAM, which offers significantly faster performance than traditional disk-based swap.
You can also check ZRAM-specific stats with:
zramctlSpecial thanks to Hayden James for his very informative blog post:
1 - MOTD (MESSAGE OF THE DAY)
By default, when you log into your Raspberry Pi via SSH, you see a static copyright notice.:

This space can be used more effectively to show useful system info, such as memory usage, uptime, system load, and more.
We’ll walk you through setting up a custom, dynamic MOTD that displays real-time information each time you log in.
To generate styled output and gather system details, install the following tools:
# Install dnsutils and figlet:
sudo apt install -y dnsutils figlet
Navigate to the MOTD script directory:
cd /etc/update-motd.dCreate three empty scripts for header, system info, and footer:
# Create empty Header, Sysinfo & Footer:
sudo touch 00-header && sudo touch 10-sysinfo && sudo touch 90-footer
Make all scripts in this folder executable:
# Make Scripts executable:
sudo chmod +x /etc/update-motd.d/*
Remove the existing static MOTD and the default uname script:
# Delete original /etc/motd
sudo rm /etc/motd
# Delete /etc/update-motd.d/10-uname:
sudo rm /etc/update-motd.d/10-unameCreate a symbolic link so that the dynamic MOTD is displayed:
# Create Symlink:
sudo ln -s /var/run/motd /etc/motd
Edit the SSH PAM config file:
sudo nano /etc/pam.d/sshAdd or ensure the following line is present:
# Insert:
session    optional     pam_motd.so  motd=/run/motd.dynamice
Add a Custom MOTD Header:
# Edit the header script:
sudo nano /etc/update-motd.d/00-header
Insert:
#!/bin/sh
[ -r /etc/lsb-release ] ; /etc/lsb-release

if [ -z "$DISTRIB_DESCRIPTION" ] ; [ -x /usr/bin/lsb_release ]; then
        # Fall back to using the very slow lsb_release utility
        DISTRIB_DESCRIPTION=$(lsb_release -s -d)
fi

echo "--------------------------------------------------------------------------------"

printf "\n"
figlet $(hostname)
printf "* %s (%s).\n" "$DISTRIB_DESCRIPTION" "$(uname -rm)"
printf "\n"

echo "--------------------------------------------------------------------------------

    :MMMMMMMMMMMMMMMMMMMMMMMMMMMMMMMMMMMMMMMMMMMMMMMMMMMMMMMMMMMMMMMMMMMM;
    MMMMMMMMMMMMMMMMMMMMMMMMMMMMMMMMMMMMMMMMMMMMMMMMMMMMMMMMMMMMMMMMMMMMMM
    MMMMWMMMMMMMMMMMMMMMMMMMMm0lccccccoxl::ccc:cccMMMMMMMMMMMMMMMMMMMMMMMM
    MMMMX;       .c:   o.   .                     ,.  ,    ,c.       dMMMM
    MMMMK,                   ,                   . ,                 dMMMM
    MMMMK,     ,::::::::::::::cc:::::::::::::ccccccccccccccccc:.     oMMMM
    MMMMK,    :NMMMMMMMMMMMMMMMMMMMMMMMMMMMMMMMMMMMMMMMMMMMMMMMO.    lWMMM
    MMMMK,    lWMMN0xolccccodOXWMMMMMMMMMMMMMMWKOdlcccclokKWMMMO'    oMMMM
    MMMMX;    lWKo,.   ..,,....;oONMMMMMMMMNOo;. ....     .;dXMO'    oMMMM
    MMMMX;    ck'  . ,c:lco00kl,..'lONMMNkc'..;okkl:c;:c...  ,0O.    oMMMM
    MMMMX;    ,'  .'c0WWWO;:KMMWKx:..,::'..cxKWMKc;kNWWWO;..  :x'    lWMMM
    MMMMX;    .. .''kMMMMNo,OMMMMWKc.    .oXWMMM0,lNWMMWNl.,. 'o'    lWMMM
    MMMMX;    ;;  .,;d0kkl;xNMWKx:. .lddc. .cxXWWkc:dkxxc;;.  lO'    lWMMM
    MMMMX;    c0c  .....,cdkdl,. .ckXMMMWXx:. .;lxdlc;',''. .lX0,    lWMMM
    MMMMN:    cNNOl,..........;lkXWMMMMMMMMWXkl;..........;o0WMK,    lWMMM
    MMMMN:    :NMMMWX0OOkOO0KNWMMMMMMMMMMMMMMMMWXKOOOkOO0XWMMMMK,    lWMMM
    MMMMN:     d000000000000000000000000000000000O000000000000kc     lWMMM
    MMMMN:                                                           oWMMM
    MMMMMMMMMMMMMW0lcc:cc:::::::cccc:::c::::cccccccccccldXMMMMMMMMMMMMMMMM
    MMMMMMMMMMMMMMMMMMMMMMMMMMMMMMMMMMMMMMMMMMMMMMMMMMMMMMMMMMMMMMMMMMMMMM
    'MMMMMMMMMMMMMMMMMMMMMMMMMMMMMMMMMMMMMMMMMMMMMMMMMMMMMMMMMMMMMMMMMMMM'

--------------------------------------------------------------------------------"
This script uses figlet to print the hostname in large letters, and shows system branding in a stylized box.
Display live system info:
# Edit the system info script:
sudo nano /etc/update-motd.d/10-sysinfo
Insert:
#!/bin/bash

date=`date`
load=`cat /proc/loadavg | awk '{print $1}'`
memory_usage=`free -m | awk '/Mem:/ { total=$2; used=$3 } END { printf("%3.1f%%", used/total*100)}'`
processes=`ps aux | wc -l`
swap_usage=`free -m | awk '/Swap/ { printf("%3.1f%%", $3/$2*100) }'`
temperature=`/usr/bin/vcgencmd measure_temp | cut -c "6-9"`
time=`uptime | grep -ohe 'up .*' | sed 's/,/\ hours/g' | awk '{ printf $2" "$3 }'`

echo
echo "System Information: $date"
echo
printf "\e[1;36mSystem Load:\t%s\t     Memory Usage:\t%s\n" $load $memory_usage
printf "Processes:\t%s\t     Swap Usage:\t%s\n" $processes $swap_usage
printf "CPU Temp.:\t%s°C\t     System Uptime:\t%s\n\e[0m" $temperature "$time"
echo
This script outputs current memory usage, CPU load, swap, temperature, uptime, and number of running processes.
Finally, add a footer:
# Edit the footer script:
sudo nano /etc/update-motd.d/90-footer
Insert:
#!/bin/sh

[ -f /etc/motd.tail ] ; cat /etc/motd.tail || true

echo "--------------------------------------------------------------------------------"
Once complete, log in via SSH again to see your dynamic, stylish MOTD in action!
2 - NETWORK CONNECTION INFO (OPTIONAL)
For some projects, it's helpful to see network connection details—such as the local IP address, external IP, and the Wi-Fi network (ESSID) your Raspberry Pi is connected to—immediately after logging in.
This can be achieved by modifying your .bash_profile to display real-time network status each time a non-admin user logs in via SSH.
If you're currently logged in as your admin user, switch back to your regular user by typing:
# Exit admin account:
exit
Log in as your non-admin user, then edit your .bash_profile:
# Edit .bash_profile:
nano .bash_profile
Paste this script into the file to display the desired network info on login:
#!/bin/sh
# GWII (global web interface info)

if [ -s ~/.bashrc ]; then
    source ~/.bashrc;
fi

echo
echo "$(tput setaf 6)$(tput bold)IP Addresses:    wlan0       `if [ "$(cat /sys/class/net/wlan0/operstate)" = "dormant" ]; then printf Dormant; elif [ "$(cat /sys/class/net/wlan0/operstate)" = "down" ]; then printf Down; elif [ "$(cat /sys/class/net/wlan0/operstate)" = "up" ]; then printf %s "$(ip -4 addr show wlan0 | grep -oP '(?<=inet\s)\d+(\.\d+){3}')"; fi`";
echo "                 ext         `if [ "$(cat /sys/class/net/eth0/operstate)" = "up" ]; then printf %s "$(dig +short myip.opendns.com @resolver1.opendns.com 2>/dev/null)"; elif [ "$(cat /sys/class/net/wlan0/operstate)" = "dormant" ]; then printf Disconnected; elif [ "$(cat /sys/class/net/wlan0/operstate)" = "down" ]; then printf Disconnected; elif [ "$(cat /sys/class/net/wlan0/operstate)" = "up" ]; then printf %s "$(dig +short myip.opendns.com @resolver1.opendns.com 2>/dev/null)"; fi`";
echo
echo "WiFi ESSID:      wlan0       \"$(iwgetid wlan0 --raw)\"$(tput sgr0)"
echo
printf "\e[0;32m--------------------------------------------------------------------------------\n"
echo
What This Script Does:
- Local IP: Displays your current IP address on wlan0
- External IP: Queries your public IP address using OpenDNS
- Wi-Fi ESSID: Shows which Wi-Fi network you're connected to
- Color-coded output: Uses terminal formatting for a clean look
If you've made it this far, well done! You've just completed the full setup we use as the foundation for all of our Raspberry Pi–based Projects. From security hardening and performance tweaks to dynamic system monitoring and remote access, your Pi is now optimized, protected, and ready to go.
This setup gives you a rock-solid, secure, and flexible starting point for just about anything, whether it's media streaming, art installations, privacy tools, or custom automation.
We hope this guide has been helpful and if you're using it in your own projects, we'd love to hear about it!
If you want to put your Raspberry Pi to use right away, check out our simple videolooper tutorial: